Do you need a digital mixer in your home studio?

This is something that has puzzled me for some time. Do I actually need a digital mixing desk in my home studio? Well, technically no. Modern audio interfaces have a mixer on-board. So if you need 8 inputs, you could just make sure that you have an audio interface with 8 inputs. Starting at around 200 euros. Going up all the way to 3000 euro’s if you can or want to spend it for top quality. Now there are several reasons for me opting for a digital mixing desk and it all comes down to flexibility.

What you don’t want is a chain of devices that add noise on every recording. So an analog desk connected to your digital audio interface is probably a bad idea. Unless it is a very high quality analog desk with a unique sound. Something that would set you back the price of a new car. So lets try to stay in the digital domain for a better price/quality ratio.

One of the reasons to eye the higher priced segment of audio interfaces is the option of a direct cue mix. A singer, or solo musician is usually best recorded dry if you don’t have the luxury of working in a room with a nice sound or at least a quiet room. On the other hand lots of singers like to have monitoring with a bit of ‘room’ on it. A bit of reverb or even echo. When you can at least make a cue mix with just a touch of some effects on it, it can make the difference.

Now lets have the best of both worlds and flexibility. I chose the Focusrite Scarlett 18/8 2nd gen. It has 16 inputs, 8 analog and 8 digital and 6 analog outputs. Additionally it has stereo S/PDIF digital in/out. hence the total of 18 in and 8 outputs. Now connect the digital mixing desk to the ADAT 8 digital inputs of the Scarlett audio interface and there you have it: 16 inputs and enough cue mix options to accommodate recording of a complete band.

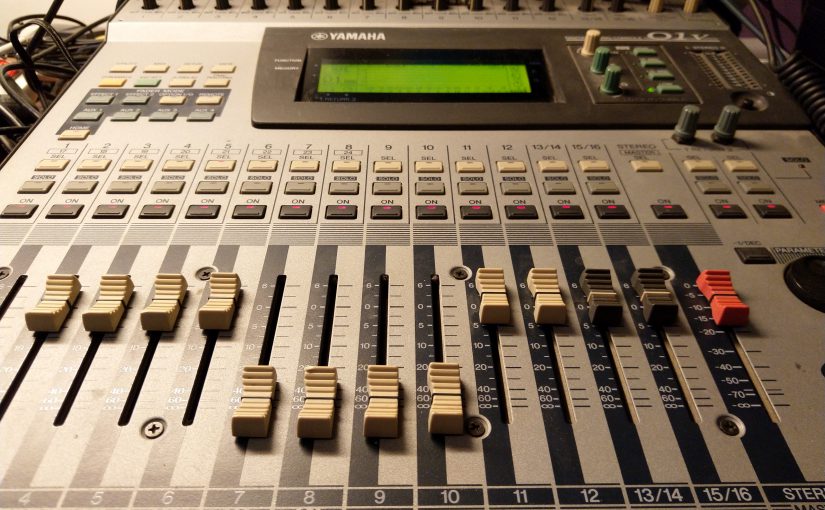
Ok, I was lucky to get my hands on a classic Yamaha 01V with ADAT interface, but I think it is still possible to get your hands on it or something equivalent for around 500 euros. Add to that about 300 euro’s for the Focusrite and there you have it: an affordable and also flexible setup that can accommodate any home studio recording session.

Versioning Ableton Live projects with large files

This is a follow-up of one of the first posts here keep-track-of-versions-of-your-song-with-Ableton. At first this was a bit tricky, because you could choose leave out large files, like .wav recordings and samples and even the .als project files. Or you could defy a warning from Git stating that it doesn’t handle large files well, performance-wise. This will hit you when you push and checkout your repository remotely. Now you can start using the new Large File Storage (LFS) feature, that handles versions of the large files as markers in the Git repository, improving the speed at which Git can handle these large files when getting the latest version remotely. Please note that these versioning tools might work for your DAW too.

But why Git versioning?

Lets go back to the beginning. Why should you consider using Git for versioning of your Ableton Live projects? Version 10 of Ableton Live keeps backups of your project files. If something goes wrong, you can go back 20 or more versions. The problem is, what version on which time and date contains which changes? There is no way to tell. With Git versioning you can attach a message to each set of changes (commit) and you can decide which part of which commit you want to keep. The thing that holds most people back from using Git is its complexity.

Git is even more powerful in combination with a shared remote repository like GitHub or Bitbucket. This will allow you to work together remotely on a shared project with more musicians, while at the same time giving you the liberty to work stand alone. Contact me if you want to hear more about this. Please note that some remote repositories are not free if you want to store private content and collaborate. Otherwise everything you put on it is public. GitHub now allows free private repositories.

Collaborative repository on GitHub

With its power comes a set of command line instructions that scares the shit out of any musician. For daily use I turn to SourceTree for a more graphical and pleasant Git experience. SourceTree is free and hides most complex command line instructions behind a more useable interface. There will be a time however when you really will have to dive in to the nitty gritty and this post will also dive deep. Fortunately the latest version of SourceTree also understands the new LFS features.

Large File Storage

The first step will be to install Git LFS on top of Git. By the way SourceTree has embedded versions of Git and Git LFS that you can install alongside. I have no idea how powerful these embedded versions are compared to the stand alone versions. Then here the steps you need to take to activate the Large File Storage feature. Open a command line in the project folder where you created your Git repository and type (as marked in bold):

b2fab@STUDIO MINGW64 /d/Documents/Ableton/Goodbye Project (master)
$ git lfs install
Updated git hooks.
Git LFS initialized.

b2fab@STUDIO MINGW64 /d/Documents/Ableton/Goodbye Project (master)
$ git lfs track *.wav
Tracking "B2FAB - Goodbye ft Hanny (Mastered).wav"
Tracking "Goodbye (instrumental).wav"
Tracking "Goodbye ft Hanny (unmastered).wav"
Tracking "Goodbye ft Hanny.wav"
Tracking "Goodbye Hanny (FY).wav"
Tracking "Goodbye.concept.wav"

b2fab@STUDIO MINGW64 /d/Documents/Ableton/Goodbye Project (master)
$ git lfs track *.als
Tracking "Goodbye Hanny (Exp).als"
Tracking "Goodbye Hanny (FY).als"
Tracking "Goodbye Hanny (FYCD).als"
Tracking "Goodbye Hanny Beat.als"
Tracking "Goodbye.concept.als"
Tracking "Goodbye.Hanny.als"
Tracking "Goodbye.instrumental.als"
b2fab@STUDIO MINGW64 /d/Documents/Ableton/Goodbye Project (master)
$

As you can see the install statement just prepares the repository. The track statements marks large file types to be treated as LFS files. From that point you need to commit this change and its .gitattributes and you are good to go. If you want I can go live on Instagram or help you out.

Commit Git LFS in SourceTree

Why I chose the Nord Electro 6D

This is a about choosing my main instrument. The main inspirational instrument in the studio as well as the centerpiece on the live stage. After working for almost 20 years with the Korg Triton Pro it was time for something new. The old monster weighed a ton and it was a traditional workstation with sequencer, sampler, MOSS synth and ROM synth. I actually used only half of its functionality. Storage was on either a floppy disk (!) or a noisy SCSI disk (40MB!). Why did I go to the Clavia Nord Electro 6D? Of course, the Electro 6D is a well known and excellent instrument and there are plenty of reviews, but why did I chose it?

The main appeal was a single feature that I once had on an old Roland (D10?). It kept playing the sound as you switched programs. It sounded a bit garbled, but at least it wouldn’t cut off the sound while switching. A major irritation when I switched to the Korg. The Nord 6D series and other Nord instruments of the same generation bring this back, but this time in its full glory. The notes you last played keep playing, when you switch programs. Every key you hit after the switch plays with the new sound. This is perfection for playing live!

The other thing is: I noticed that almost all my music centers around piano, strings and organ sounds. This is where the Electro 6D excels. All sounds that don’t need pitch bend and you might have noticed that the Electro 6D doesn’t have it. The occasional whoosh and bleep and bloop can come from other instruments. Because it doesn’t have all the controls and in general isn’t made to be a master midi controller I use the Komplete Kontrol A49 in the studio for that. It has a very similar touché also.

Live Mode
Live Mode

Another highlight of the Electro 6D is the Live Mode program selection in the center controls section of the keyboard. This switches the four program selectors into a set of pages with your favorite preset sounds. Including all mix and effect settings. This what I desperately need live. I used to move around sounds to have them as the first programs in the list, but with the separate Live Mode list I can put them right there and leave the program list as it is. Just to be sure I made a backup of my Live Mode favorites to have them back as I want, even when something gets twisted and accidentally saved as part of the Live Mode preset.

Organ register sliders

Then some small niceties. I chose the Electro 6D and not the Electro 6HP for the real organ sliders and its lower weight (9 kg instead of 11 kg). I have always played springy keys. In that sense I am not a true weighted keys piano player. I don’t use split keyboard sounds currently, but in the past I have used splits live also and the Electro 6D has the guidelight splits for that. In short, it has all the things that I dearly need and not a lot more or less.

Guide light splits
Guide light splits