Yes I am using MIDI control as part of my live streaming. How? In a very straightforward way. Playing a new song will trigger a video clip playing as a backdrop for the stream. It can also trigger a scene in the lighting unit. Live streaming is my way to improve my live performances, even though a live stream is not the same as a live show. Anyway, hence my endeavors to still improve my live streams and make MIDI control a reliable part of the live stream.
The old way: MIDIControl
Up to now I had to rely on a separate program MIDIControl to catch MIDI events and relay these to OBS . I can tell you that any chain of devices or software is easily broken in a live stream. More then once I was in a situation where it simply didn’t work. No harm done musically, but the show does look a bit more bland. Lately a new version of OBS broke the link permanently. I had to wait for an update for the MIDIControl program.
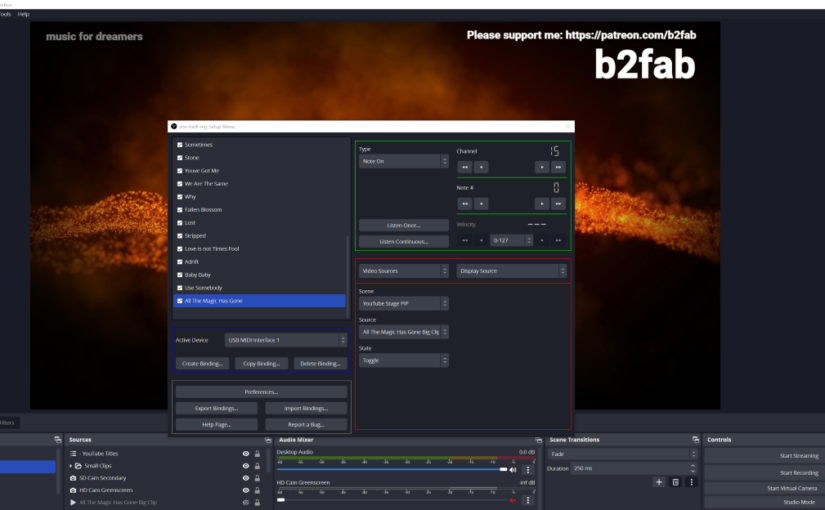
This triggered a new search for alternatives and I found one in the form of a true OBS plugin: obs-midi-mg. The first version I used was a 1.x version, the latest version 2.2 has lots of improvements in the UI. In the first version you had to step into binding, step out and step into action to make a scene change work. Now it’s all on one page, like you can see in the screenshot in the header. The big improvement for me is that it is simply there when you start OBS. No need for the chain of programs to be up and running and connected.
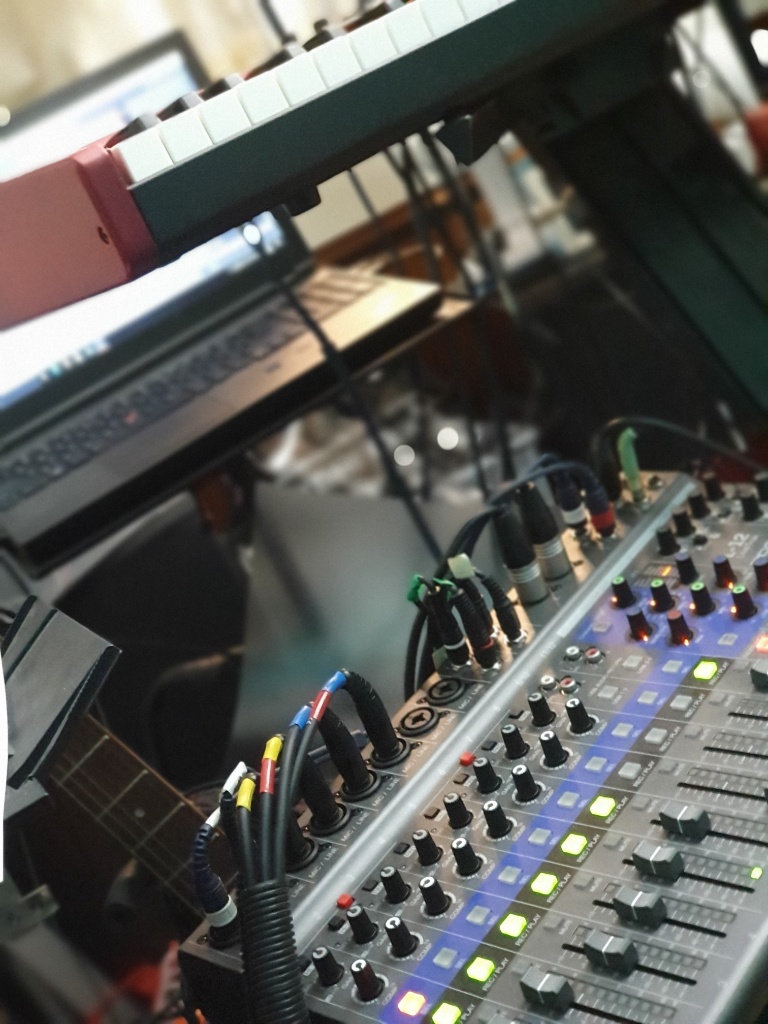
For capturing MIDI I use a simple and cheap USB MIDI interface. It even does not have a brand I think. MIDI on windows is very sensitive to plugging it into a different USB port, that is why I put it on a separate interface that never moves. The plugin is setup to listen for a note being played and then trigger a video source to be shown. The video source starts playing from the start when becoming visible and never loops. I keep a spreadsheet with all the bindings to keep track of the note numbers used on different channels.
I hope I have inspired you to make MIDI control a reliable part of your live stream. There are many more useful applications possible. Also for instance using a Launchpad to trigger actions on sources in your Scenes.
Last Friday I had a Halloween themed livestream in OBS. I wanted point the viewers to my upcoming song release and I wanted to play back a video with an interview I had with Pi.A about our collaboration on the new song. I tested everything in the afternoon and in the evening it turned out that there was no sound on the stream from my audio system. Bummer. After restarting the stream seemed to work again. Just a touch of real Halloween horror? I hope I can help you troubleshoot or make more advanced use of audio mixing and routing in OBS.
I spent this whole afternoon checking and rechecking my audio mixing and routing in OBS and I found no problem at all. It turns out that these things just happen. Let’s say that that is the charm of performing live, lol. However, it was something that had been long on my list to check out thoroughly, because I also had problem earlier with audio. So here is a recap of everything I know now.
Since you are probably a musician reading this, I won’t bore you with mixer basics like dBs and I’ll assume that you know how clipping sounds on audio output. I will also assume that you have no interest in Twitch Video On Demand stuff that is baked into OBS, because it is more geared towards gaming streamers.
It all starts with the sources
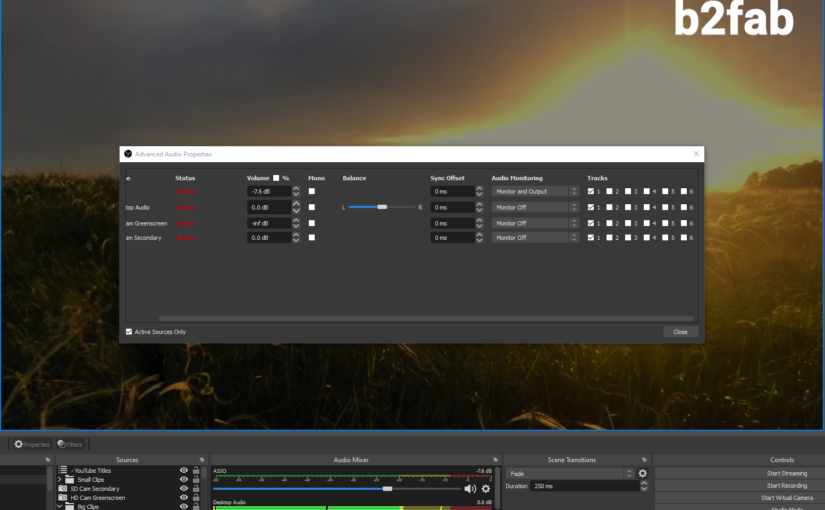
Every OBS source that outputs sound will appear in your center Audio Mixer panel. You can adjust the levels to your needs. Green is the safe area. Yellow is where your speech and music should ideally be. Red is the danger zone where the dreaded clipping might occur. You can mute a source to make sure it will not be recorded or streamed. By default all audio sources will be mixed to your stream or recordings.
OBS for now misses a master output level indicator. It might be added in the future. So if you mix in many different sources you end up guessing if the output will be OK. For now I exclusively mix the ASIO source, so that makes it easy to make sure the output is right. I mix in the Desktop audio just in case I have a sound from the PC I want to quickly mix in.
Just to be sure I added the Limiter as a filter. It’s not impossible to get an overcooked sound in the livestream, but the risk of clipping or overcooking goes down.
On the right track
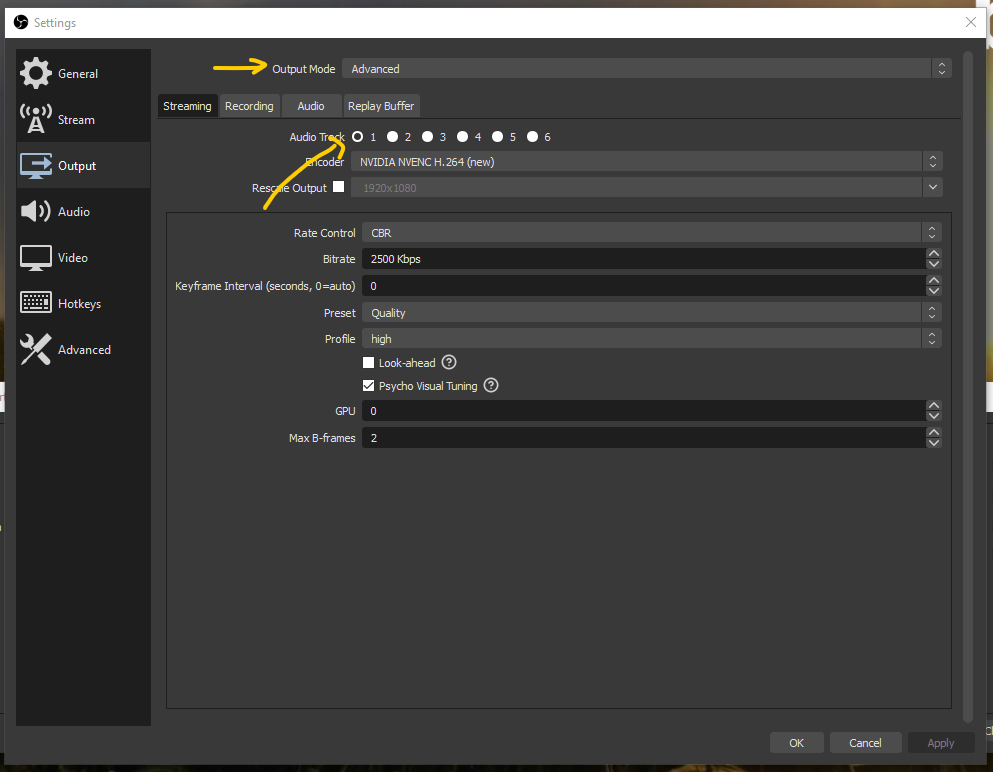
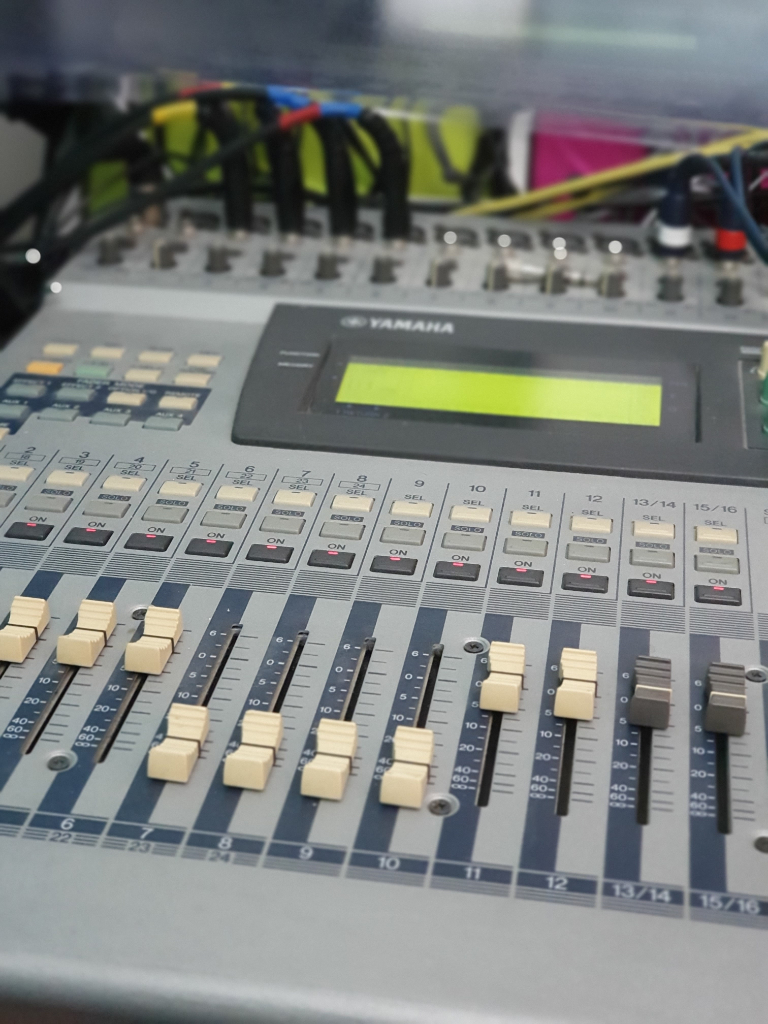
If you right click in the Audio Mixer section you can go to the Advanced Audio Properties. Here you see all your sources, that is to say you can still choose to see only active sources. I have more complex scenes where I choose per song I play live which sources are active. On the right side you will see a block of six Tracks. These are stereo tracks you can mixdown to, so in fact you have a mixer before you with six stereo tracks.
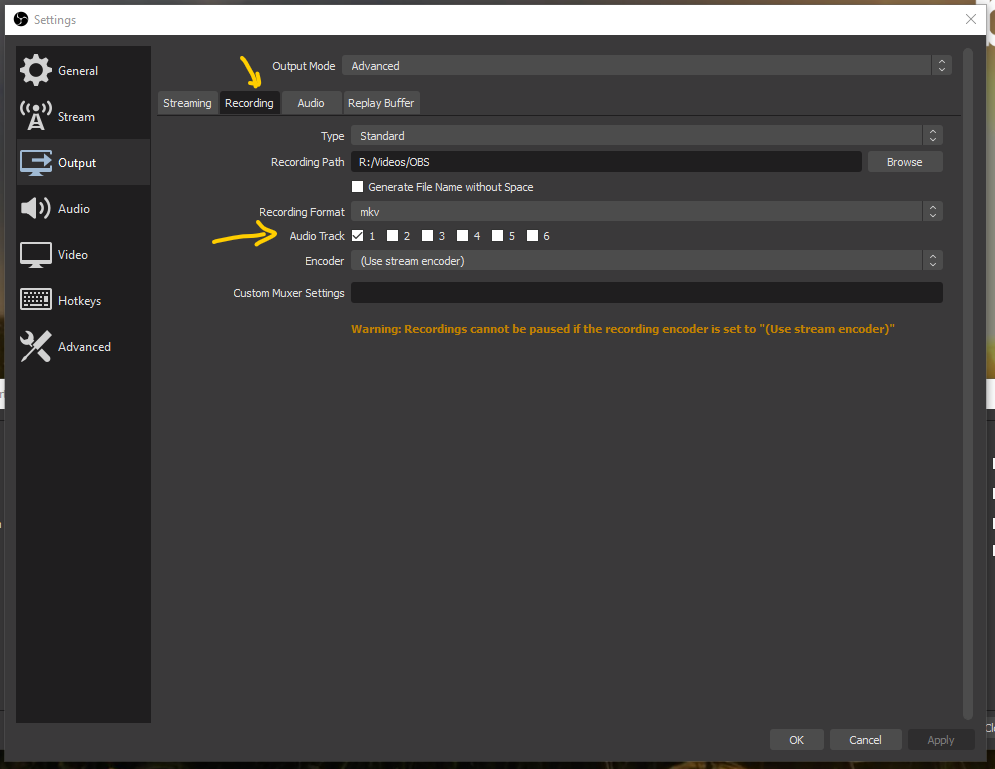
Your live stream will use only one track. You can choose which one in the Advanced Streaming Settings for Output. By default it will be track 1. Now what is the use of having separate tracks to mix to? These tracks can be used for recording video with OBS. The tracks will end up written separately in the video file it records.
Gamers use this to have a track with the sound of the game and a track with their voice-over. Maybe also a separate track for sound effects and one for music. Then when they stream to Twitch they can leave out copyrighted music and still upload to YouTube with music. In the Advanced Recording Settings for Output you can choose which tracks will be written into the video output file.
Monitoring the output
If you leave everything set up as it is by default, all audio sources will output to your stream or recordings as you have just set it up. However there will not be any monitoring of the streamed or recorded output. This makes it heard to find the balance between different sources, if you have them. If you want to start monitoring you will have to select a Monitor option in the Audio Mixer settings. So there is also a stereo monitoring channel next to the six tracks.
In the Audio Settings, you will find the monitoring section. Here you can choose where to output the monitoring to. Please be aware of the latency that OBS introduces on the monitor output. You can’t use it live. You can just use it to find the right balance between different audio sources.
So what if there is no sound?
If you look in the monitoring options for an audio source in the Audio Mixer, there is even option to output sound to the monitoring channel, but not to the output tracks! So there is the option to set the level of an audio source to -inf, to mute the output and the option to switch off output to any of the output tracks. On top of that you could choose a track that does not get mixed to your stream. Very flexible, but it can also make it hard to find out why you have no sound on your stream.
There are only two ways to test your audio before really going live. The first one is to make sure you output the same track as your streaming track on a recording and then record a short video. The second one is to stream to an unlisted (YouTube) or private (FB) stream and then check the result. In short it is a miracle that this was the first time in maybe 50 livestreams that I had audio problems. Because it is live it is hard to know what the audience is hearing. I always ask at the start of a stream. Audio is really a tricky thing in a livestream to get right.
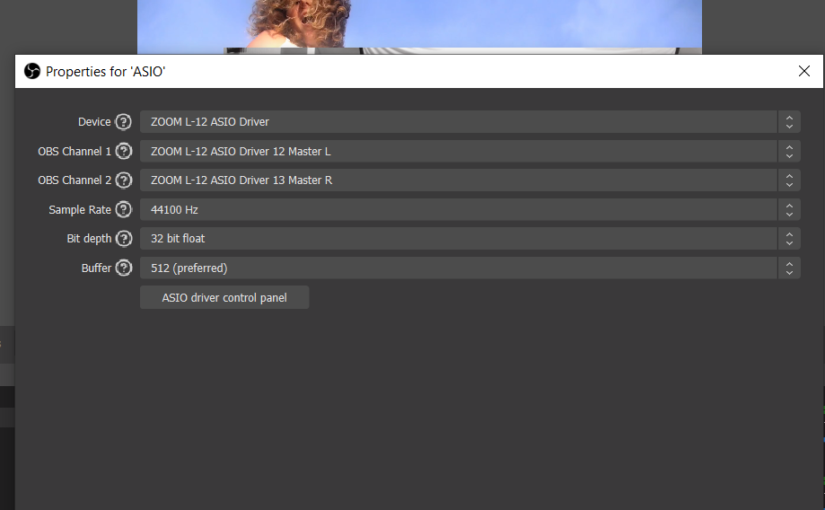
In a previous post I discussed how I try to have good audio quality for my livestream with OBS, by linking up a mixing desk I use for all live performances with a studio audio interface that I use for live streaming. So the idea is that when I know how to mix my live performance I can also livestream that mix with good audio quality. OBS supports high quality audio with an ASIO plugin, so all is great.
The mixing desk I use for live shows and streaming is the Zoom LiveTrak L-12. Lately I started using a separate laptop to do the livestreaming, not hooked up to the studio. For a livestream I would switch over the interface cable to the laptop. Only a few days ago I realized that the L-12 itself is an audio interface and I slapped my forehead.
Sure enough, when installing the L-12 driver software and starting up OBS with the ASIO plugin, I could find the Zoom device. After assigning the master output channels to the OBS inputs it worked immediately. So now the setup is way simpler. The livestreaming laptop is hooked up directly to the mixing desk. The master mix now is hooked up directly to OBS.
Livestreaming setup simplified the L-12 connects to the streaming laptop
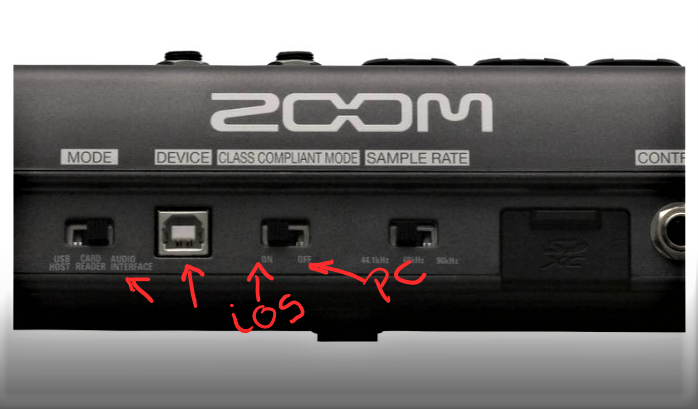
Now I asked myself, can I use the same trick to hook the L-12 directly to an iPad or iPhone to do livestreaming on Instagram, or other phone based streaming platforms? The L-12 can connect as a class compliant interface, so its no problem to hook it up to iOS devices. Software like Garageband will find its way in the Zoom inputs and outputs. You have to set a switch for this on the back next to the USB port.
Zoom LiveTrak L-12 Backside USB connector and switches
However, the master outputs are not output channels 1 and 2, so iOS devices cannot pick it up as the default audio input. So no easy live streaming on the iPad or iPhone directly from the L-12 unfortunately. For this you will need to hook up another class compliant interface that picks up the mix desk outputs and does output the master mix on channels 1 and 2.
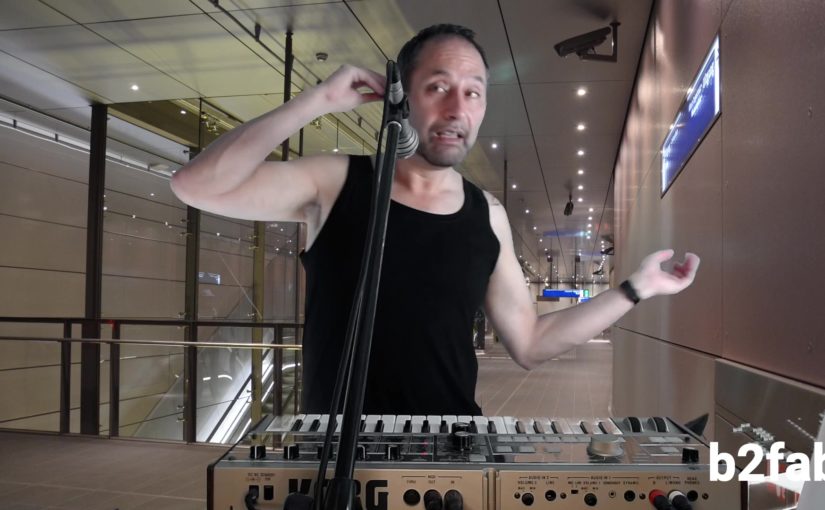
Running a live stream with OBS can be tough if you want to have a little bit of a show and you’re making music at the same time. In OBS you can dynamically change whole scenes or switch individual sources (video clips, images, text, cameras, audio) on and off. In my case I want to launch different video clips for different songs. And I have a panic scene without camera and audio to just show that I’m busy fixing something. Fortunately OBS is full of neat little tricks to allow you to run the show with just keyboard shortcuts, or if you want to, with a push of a button on a remote control. No need to wander around with the mouse to try to hit the right spot.
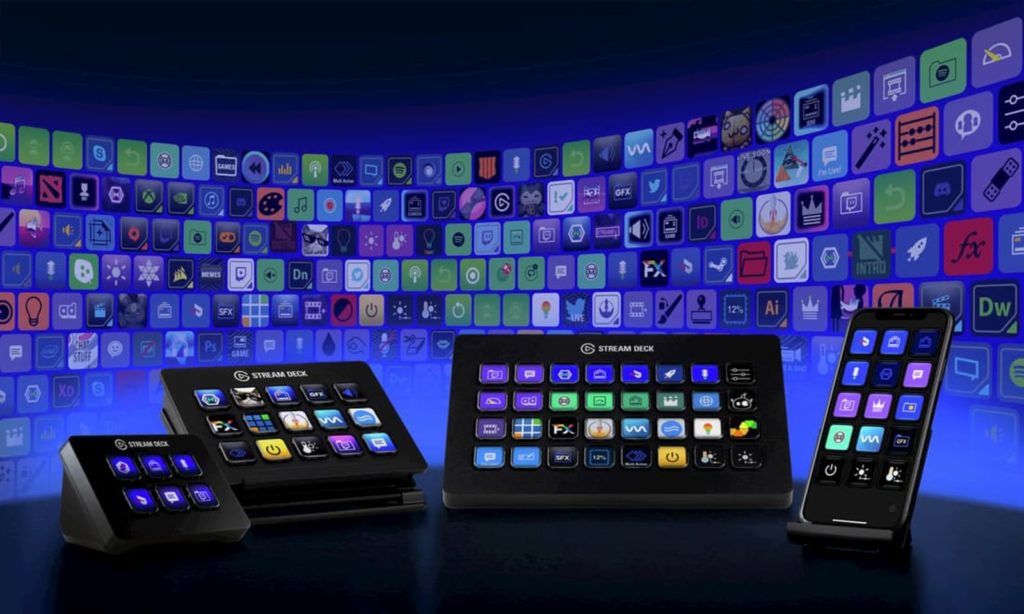
Elgato Stream Deck options
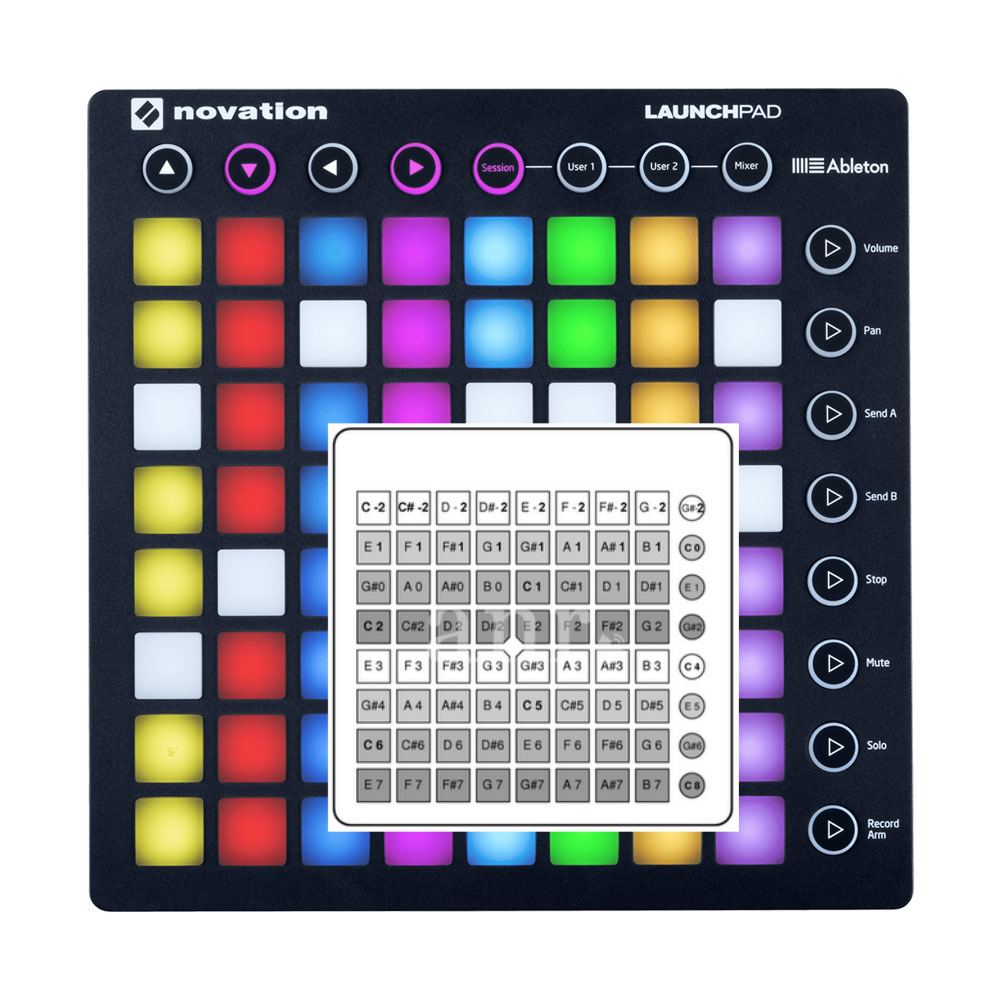
One of the many options is an Elgato Stream Deck but I always hesitated to buy it. The different sizes cater for different needs, but I find it a bit pricey for just the single purpose of controlling OBS remotely. As a musician it seemed more logical to use a Novation Launchpad or other MIDI controller. The Stream Deck is the Rolls Royce option, no doubt, but it is an investment.
Unfortunately there is no standard MIDI support for OBS and also it needs to be two-way. When you push a button this sends a message and to light up the button to confirm your choice OBS needs to report back. That is what I would expect to happen on a Launchpad. You also need to map OBS events to MIDI keys. A Launchpad has very specific key sequence per row of buttons. Up to now I did not find an acceptable plugin or solution for MIDI. If you have please let me know.
Novation Launchpad and its MIDI key mapping
Maybe you noticed the mobile option in the Elgato line-up above? For the past months I controlled OBS remotely using a phone or the iPad, but I didn’t use the Elgato Mobile app. You can opt for Elgato mobile, but it has a monthly or yearly subscription model. Again there are more affordable options. All starting with installation of the websocket plug-in in OBS. There are several to choose from. I’ve used the StreamControl app the longest, but eventually reached its limits. If you have just a set of scenes to control it’s perfect. It couldn’t handle my 20+ video sources to choose from during a live stream.
Please note that if you use Streamlabs OBS you can remote control with the Streamlabs Deck app. The Streamlabs Deck app can be paired with a QR code. I have the pure OBS version running, so this is why I need the websocket plug-in and I can’t use the Deck app.
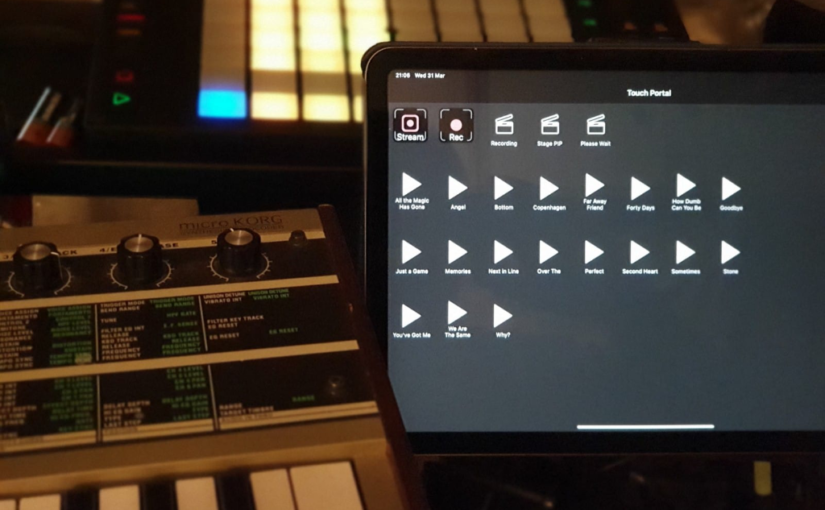
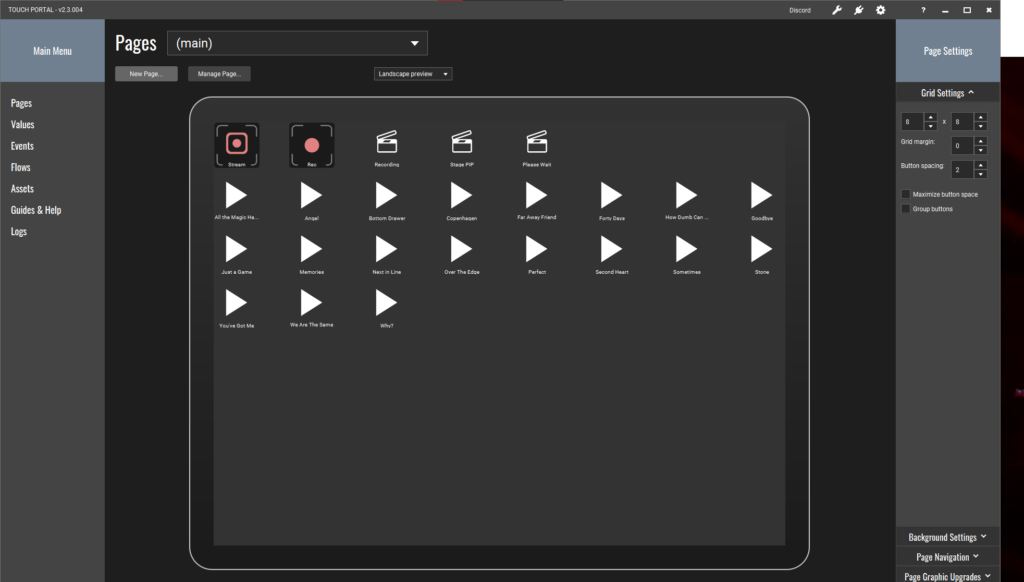
Touch Portal application
Eventually I stepped up to Touch Portal and that is what I use now. It can do your dishes, the laundry and reserve a table for your next dinner and also controls OBS. It also needs the OBS websocket plugin by the way. It has a companion Touch Portal app that you can install. I use the paid version on an iPad so I can use the full surface of the iPad to remote control so in total I invested 14 euro. I saw no other way to be fully in control and up to know it hasn’t failed me. If you have found a better way to remote control OBS during a live stream show, please let me know in the comments!
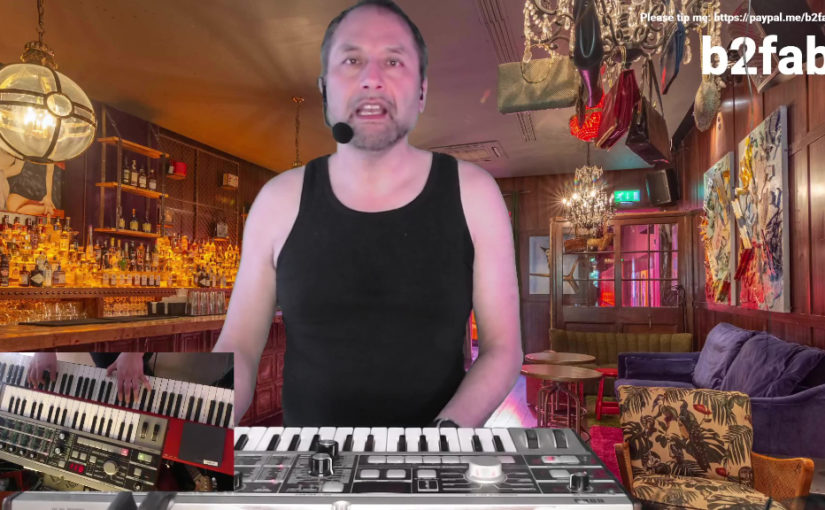
Yesterday I did a live stream with a new head microphone or headset mic and for the first time since using it, something went wrong. Kind of spoiling an hour long live stream. Before this I used my old faithful AKG D330 on a microphone stand, but when streaming, visually this was kind of a pole with a big thing in my face. So, enter the Samson Wireless Concert 88x I chose this mic because it was affordable and suited for singing. Worth an experiment.
A big stand and microphone
A lot of these affordable headset are for sport instructors, so more intended for the frequency range of the spoken word. Also a lot of the smaller, more invisible, headset mics have an omnidirectional sensitivity. I was worried that such a mic would pick up the key clicks and foot pedal stomps. This mic has cardoid sensitivity that seems to only pick up my voice and not any of the noise from playing. Comfort while wearing is also an aspect and adjustability. On most aspects this mic is fine for me. Audio quality is a little less transparent then the AKG, but acceptable.
The first reactions on the looks in the live stream are positive. Visually this is an improvement over a big round mic on a stand. One aspect of these mics is that, because they’re stuck to your face, you can’t vary the distance to the mic anymore. Any intention or emotion you want to add, by yelling with the mic far away, or whispering with the mic close by is impossible. Some singers that want to belt with the mic far away will feel limited. In my dreamy pop songs I am missing it a little, but not a lot.
The first real pitfall I fell in was yesterday. Because I wanted to drink some water before going live a moved the mic a little bit from my face. Then in the live stream someone remarked that my voice volume was so low. I started fiddling with the faders for the mic, but only after watching back the live stream I saw that it was too far from my face. Caught by the cardoid sensitivity!
Some other downsides are when I breathe through my nose, the wind blows straight into the mic. Resulting in a rumbling sound. Also, one of my songs starts with a part where it’s like i’m calling a friend and speaking into the answering device. The design of this mic more that ever makes me look like a call center employee hahaha.
Samson Wireless Concert 88x
Another aspect is that it is a wireless model. I chose this because eventually I want to play really live again and it would be convenient. It means however that I now have to rely totally on a set of batteries. When you buy an inexpensive set like this, there is no battery indicator. For now it seems reliable in battery life and there have been no problems with the wireless connection. I’ve had maybe 6 hours of operation from the first set of batteries. I hope it won’t fail on my while playing live. Knock on wood.
I’m also the kind of person that immediately starts using a new gadget like this. Tossing aside the manual. But browsing through it after some days I found out that you should not skip reading it. Here in the studio it works out of the box on the default frequency. Live however you and I will undoubtedly have to fiddle around to find the best frequency and you need instructions from the manual to set up right.
For now this little and affordable gadget sounds good enough, really adds convenience and just looks better.
The first platform I looked at when starting to stream live was Instagram. Straight from the start it was obvious that Instagram wants you to use a phone. It needs to be upright and there is no out-of-the-box streaming solution for connecting streaming software from a PC. There are some software packages that allow you to stream from your PC to Instagram, like YellowDuck. These always need to jump through some hoops like authentication. I didn’t want to go there.
OK. Streaming from your phone seems to be the way for Instagram. In a previous post I explained that I want a good live audio quality. When live streaming, my starting point is the output from the mixing desk that I would connect to the PA when playing live in real life, if you know what i mean. So I feed the output of the live mixing desk directly into to the PC that streams to YouTube etc. Now for me the question is how to feed this into your phone. It could be very ‘live’ to use the microphone of the phone, but I could only see it lead to a noisy and garbled live show.
Fortunately, there are several ways to feed audio into your phone. Just like feeding the audio to a live streaming PC. Isn’t it amazing how phones have become kind of like the modern ultra portable PC? The bad news is that this time your cheap budget phone probably won’t cut it. You either need an iPhone or an Android phone above mid-range.
For an iPhone you can find plenty audio to lightning cables. If you want a bit more control you can use most of these iRig devices in the interface product section. Some of these have 2 inputs so they can act as some kind of live mixer for maybe a guitar and a microphone. For Android the situation is slightly more complex. You can check if your phone supports access to the audio by means of the USB C plug, or you can check if your phone supports OTG on its USB plug. If OTG is supported again most of the iRig devices will work like a charm.
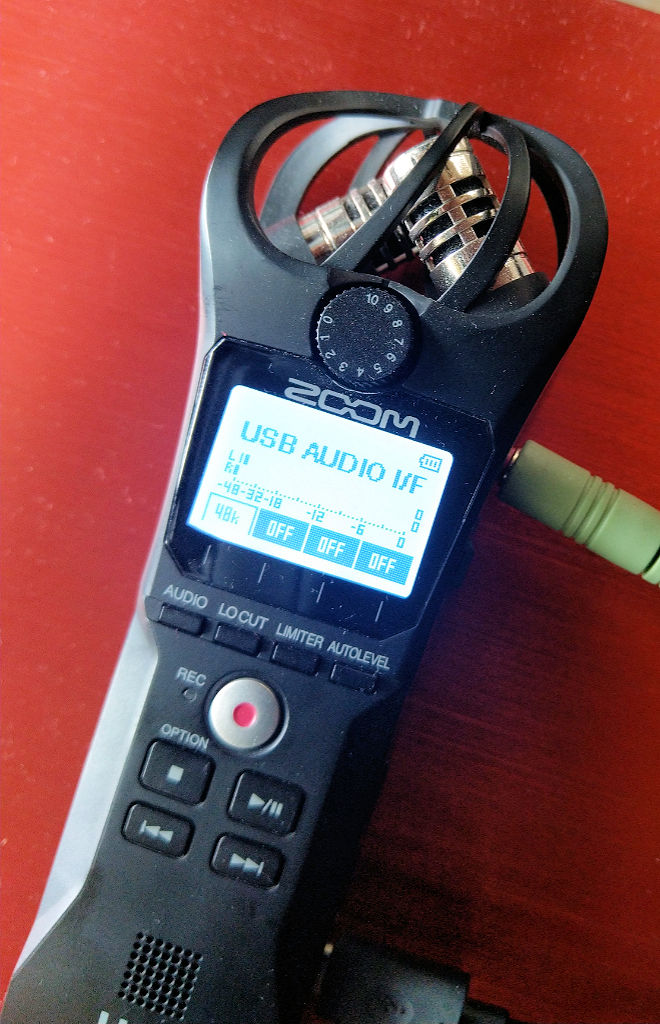
Zoom H1n as an audio interface
In my case the Samsung Galaxy S10 supports OTG. So the first thing I did was lookup all the iRig devices to see which one was most suitable. Then I came across the Zoom U-22 and U-24 devices. There I remembered that my Zoom H1n is actually also an audio interface. Then I tested if the Samsung Galaxy S10 recognized my Zoom H1n as an audio interface and boom! Instant success! No need to buy anything new. Then I got carried away, because my live mixer is also from Zoom and I connected my live mixing desk as an audio interface, but that didn’t work unfortunately. The phone crashed.
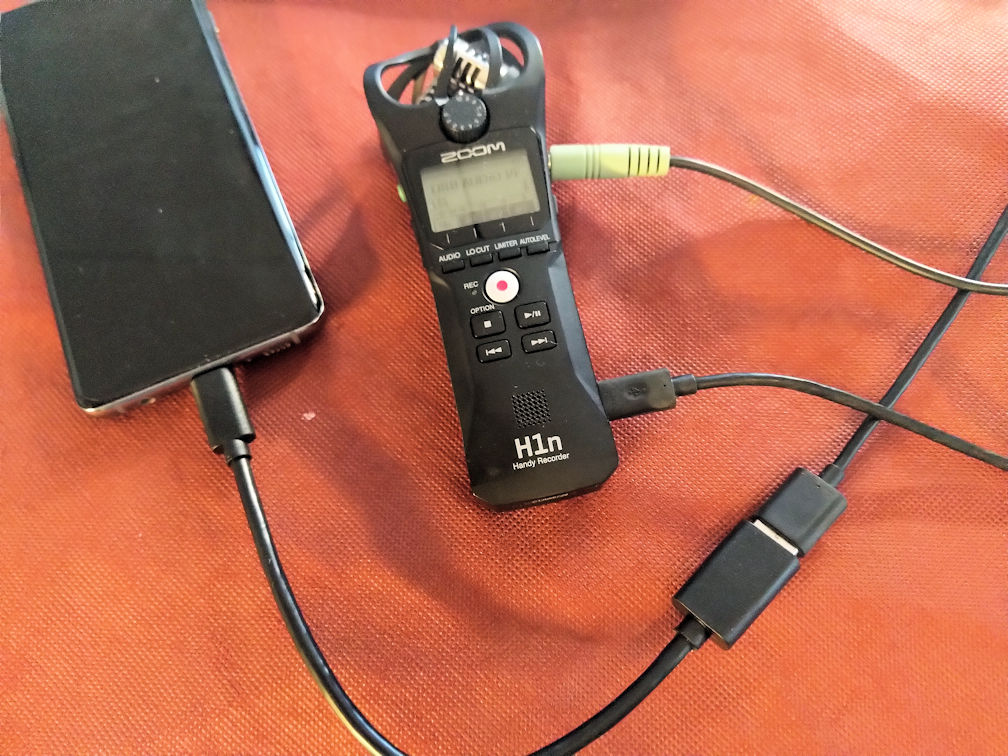
Instagram live streaming setup
So this was the setup for my first Instagram live stream. A special OTG cable connects the USB port of the Zoom H1N with the phone. The Zoom H1n line in is connected to the mix output of the Zoom L-12 LiveTrak mixer. The first results were very promising. Unfortunately I could hear a quite audible hiss. It should tune the signal flow between the live mixer and the audio input. It could also be that the quality of the Zoom H1n as an audio interface is inadequate. Another downside is that you have to rely on the Zoom H1n batteries and/or your phone batteries. Maybe not a good idea if you want to do a live stream marathon. For my purposes now its OK. I hope you can now too join the flood of Instagram live streamers!
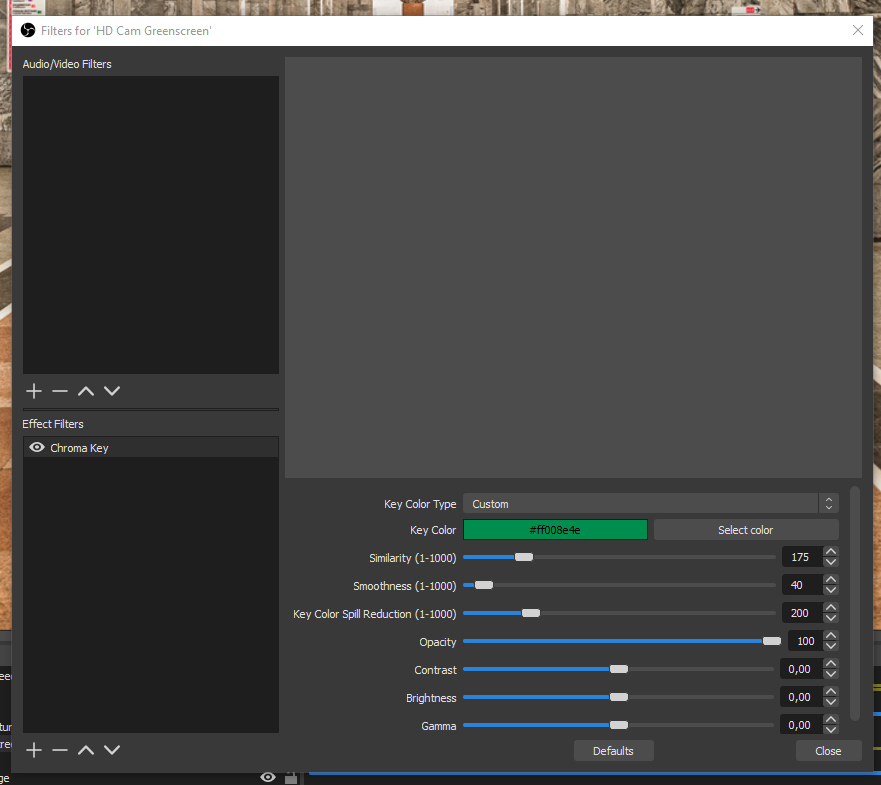
If you have seen my recent live streams, you will have noticed that I ‘travel around’ these days while live streaming. I’ve started to use the Green Screen effect. With OBS Studio its so dead simple that you can start using it with a few clicks in your OBS Studio scenes. Of course there are also some caveats I want to address. The main picture for this post shows you what it can look like. It may not be super realistic, but it is eye catching.
So what do you need to get this going? A Green Screen is the first item you need. It does not have to be green. It can be blue or blue-green, but it should not match skin color or something you wear. It should cover most of the background, so it will need to be at least 2 meter by 1.6 meter, which is kind of a standard size you can find in shops. It should be smooth and solid. Creases and folds can result in folds in the backdrop, but some rippling is OK.
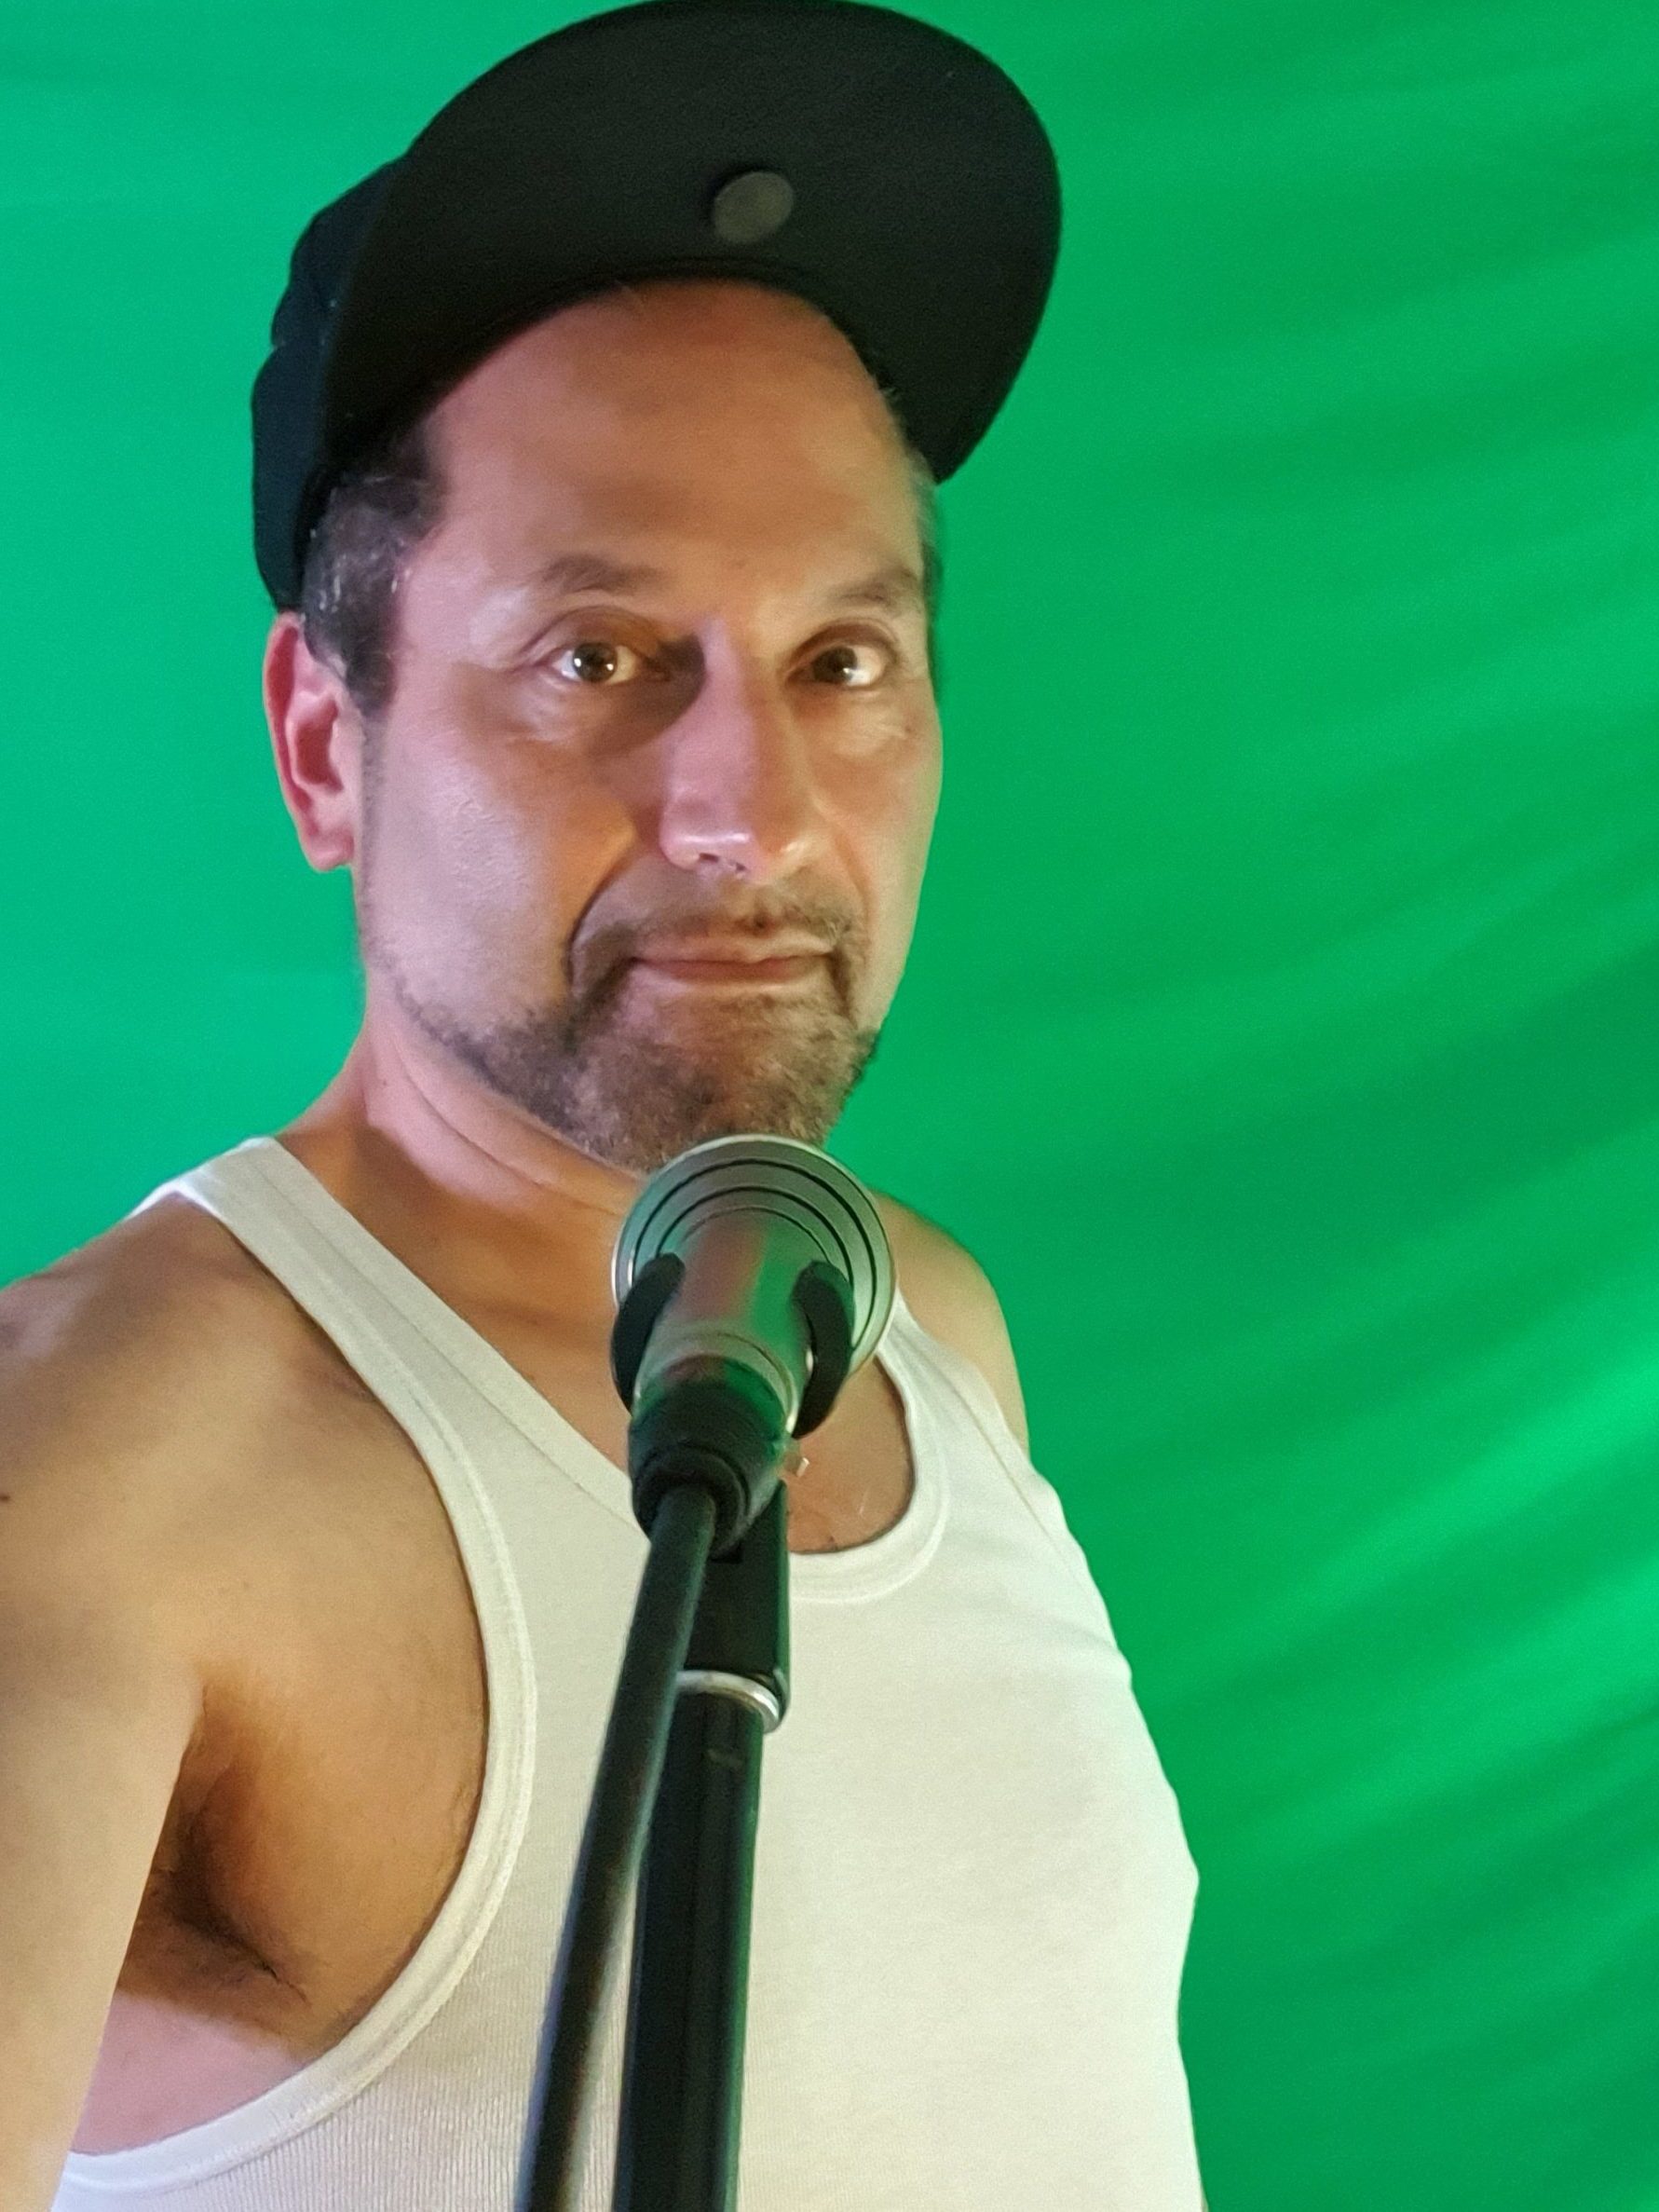
Green Screen selfie
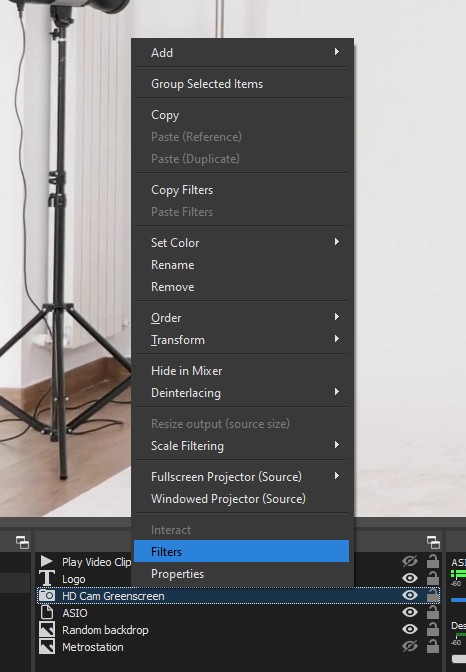
Then you need to set up OBS Studio. Its as simple as right-clicking your camera in the scene and selecting the Filters properties. In the dialog add the Chroma Key filter and select the color of your green screen. Then slide Similarity from somewhere around 100-250 to get a good picture. Everything outside the color range will become black. Then add a backdrop image (or video!) somewhere below the camera in the the scene list and you will have your Green Screen effect.
OBS Camera FiltersOPBS Chroma Key Filter settings
The first caveat I bumped into was that I set it up during daytime and it kind of worked, but then I found I stream in at night time and then you need light. In fact it turned out that 2 photo studio lights came in handy. When you use at least 2 studio lights they also cancel out shadows through folds and creases in the green screen. It does however bleed a little onto you as a subject, so you will be strangely highlighted as well. This is something you can also see in my first Amsterdam subway picture. Because of the uneven lighting in subways it does not really show. Not every picture is suitable as a backdrop. Photos with people or animals don’t work, because you expect them to move.
The second effect you see is that instruments with reflective surfaces also reflect the green screen. This will result in the background shining through reflecting surfaces. My take is that its a minor distraction, so I accept some shining through of the backdrop. Its also possible that some parts of your room don’t fit well with the Green Screen, doorways or cupboards. In that case you can choose to crop the camera in the scene by dragging the sides of the camera in the scene with the Alt-key (or Apple key) down. The cropped camera borders, will be replaced by the backdrop.
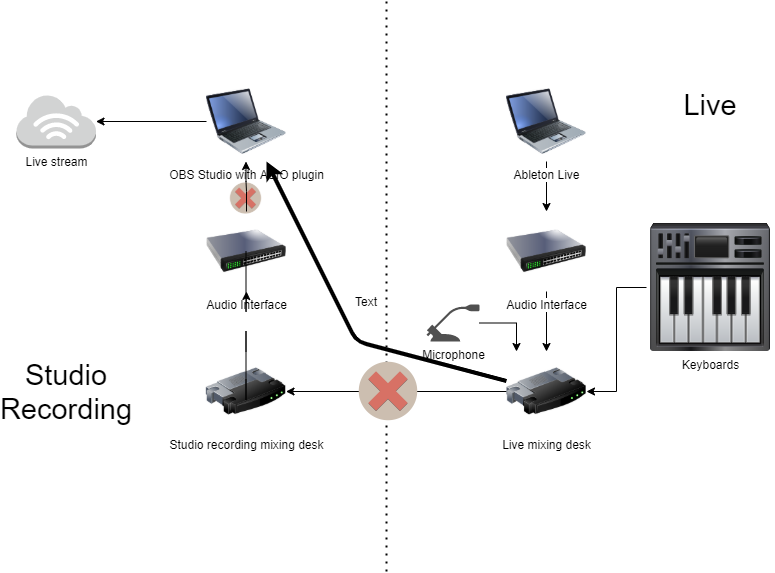
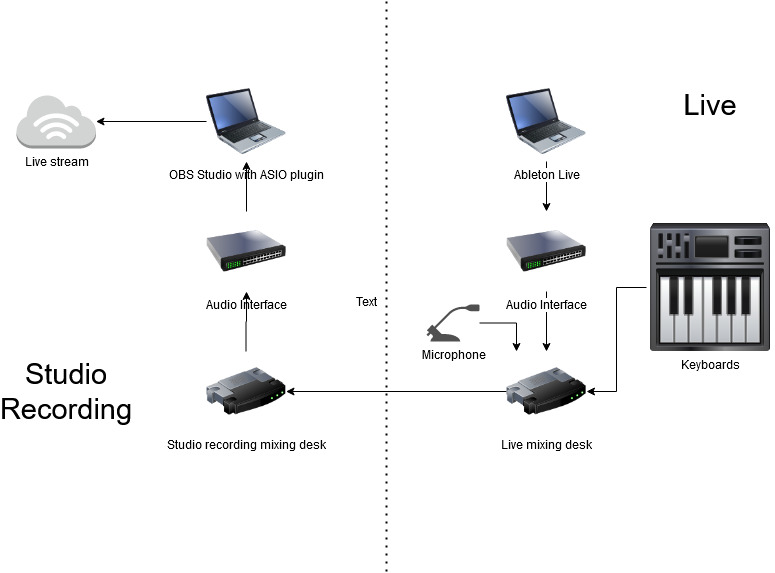
In a previous post I mentioned that I use OBS Studio for my live streaming and a little bit about how. It shows that I use an ASIO plugin for audio in the OBS Studio post, but why is it needed? For me in the live stream I want to recreate the studio quality sound, but with a live touch. After all, why listen to a live stream when could just as well listen to the album or single in your favorite streaming app? Lets first see where the ASIO plugin comes into play.
For OBS Studio and the live streaming setup, I chose to use PC on the studio recording side. Its directly connected to the Internet (cabled) and can easily handle streaming when it doesn’t have to run studio work. I play the live stream on the set dedicated to playing live and i use the live side stereo PA audio out to connect it to the studio side to do the live streaming. This means the live side if the setup is exactly as I would use it live.
Home Studio Recording Side
It all starts with the stereo output on the Zoom L12 mixing desk, that normally connects to the PA. On the mixing desk there is vocal processing and some compression on all channels to make it sound good in live situations. To get this into the live stream as audio I connect the stereo output to an input of the Yamaha mixing desk. This is then routed to a special channel in the studio side audio interface. This channel is never used in studio work.
Of course it could be that your live setup simpler then mine. Maybe only a guitar and and a microphone. But the essential part for me is this that you probably have some way to get these audio outputs to a (stereo) PA. If you don’t have a mixing panel yourself and you usually plug in to the mixing desk at the venue, this is the time to consider your own live mixing desk for streaming live. With vocal effects and the effects that you want to have on your instruments. Maybe even some compression to get more power out of the audio and make it sound more live.
But lets look at where the ASIO plugin comes into play. The ASIO plugin takes the input of the special live channel from the Yamaha mixing desk using the studio side audio interface and that becomes the audio of the stream. Because I have full control over the vocal effects on the live side, i can just use a dry mic to address the stream chat and announce songs. Then switch on delay and reverb when singing. Just like when I play live, without the need for a technician even.
Playing a live stream is different from playing live, because it has a different dynamic. In a live stream its OK to babble and chat minutes on end, this is probably not a good idea live. I find however when it comes to the audio, it helps to start out with a PA ready output signal. Similar to the audio you would send to the PA in a real live show. Also it helps to have full hands on control over your live audio mix to prevent you having to dive into hairy OBS controls while streaming live. Lastly, for me its also important that streaming live is no different from a playing live at a venue in that you can break the mix, miss notes, mix up lyrics and that you feel the same nerves while playing.
I use cookies on this website to see statistics and make sure that you can find your way. By clicking “Accept”, you consent to the use of cookies for only this.
I will never sell your personal information. I'm in it for the music!
This website uses cookies to improve your experience while you navigate through the website. Out of these, the cookies that are categorized as necessary are stored on your browser as they are essential for the working of basic functionalities of the website. We also use third-party cookies that help us analyze and understand how you use this website. These cookies will be stored in your browser only with your consent. You also have the option to opt-out of these cookies. But opting out of some of these cookies may affect your browsing experience.
Necessary cookies are absolutely essential for the website to function properly. These cookies ensure basic functionalities and security features of the website, anonymously.
Cookie
Duration
Description
cookielawinfo-checkbox-analytics
11 months
This cookie is set by GDPR Cookie Consent plugin. The cookie is used to store the user consent for the cookies in the category "Analytics".
cookielawinfo-checkbox-functional
11 months
The cookie is set by GDPR cookie consent to record the user consent for the cookies in the category "Functional".
cookielawinfo-checkbox-necessary
11 months
This cookie is set by GDPR Cookie Consent plugin. The cookies is used to store the user consent for the cookies in the category "Necessary".
cookielawinfo-checkbox-others
11 months
This cookie is set by GDPR Cookie Consent plugin. The cookie is used to store the user consent for the cookies in the category "Other.
cookielawinfo-checkbox-performance
11 months
This cookie is set by GDPR Cookie Consent plugin. The cookie is used to store the user consent for the cookies in the category "Performance".
viewed_cookie_policy
11 months
The cookie is set by the GDPR Cookie Consent plugin and is used to store whether or not user has consented to the use of cookies. It does not store any personal data.
Functional cookies help to perform certain functionalities like sharing the content of the website on social media platforms, collect feedbacks, and other third-party features.
Performance cookies are used to understand and analyze the key performance indexes of the website which helps in delivering a better user experience for the visitors.
Analytical cookies are used to understand how visitors interact with the website. These cookies help provide information on metrics the number of visitors, bounce rate, traffic source, etc.
Advertisement cookies are used to provide visitors with relevant ads and marketing campaigns. These cookies track visitors across websites and collect information to provide customized ads.