Livestreaming with good audio quality with the Zoom Livetrak L-12

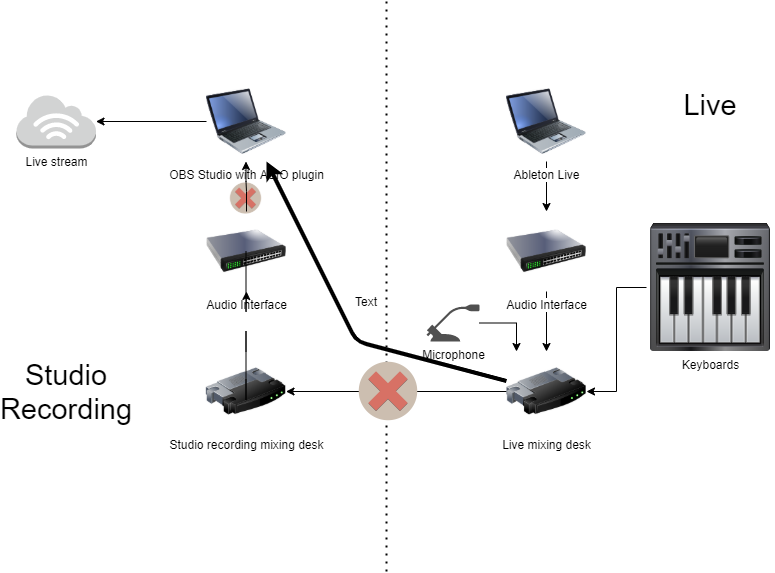
In a previous post I discussed how I try to have good audio quality for my livestream with OBS, by linking up a mixing desk I use for all live performances with a studio audio interface that I use for live streaming. So the idea is that when I know how to mix my live performance I can also livestream that mix with good audio quality. OBS supports high quality audio with an ASIO plugin, so all is great.

The mixing desk I use for live shows and streaming is the Zoom LiveTrak L-12. Lately I started using a separate laptop to do the livestreaming, not hooked up to the studio. For a livestream I would switch over the interface cable to the laptop. Only a few days ago I realized that the L-12 itself is an audio interface and I slapped my forehead.

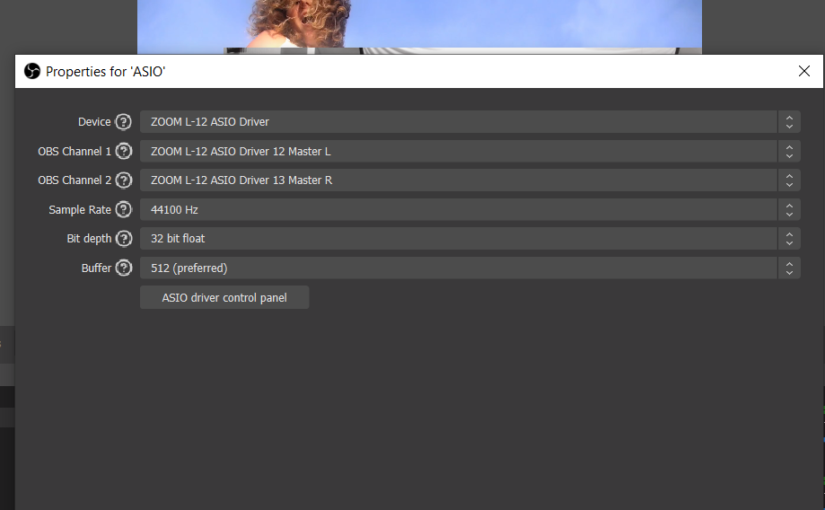
Sure enough, when installing the L-12 driver software and starting up OBS with the ASIO plugin, I could find the Zoom device. After assigning the master output channels to the OBS inputs it worked immediately. So now the setup is way simpler. The livestreaming laptop is hooked up directly to the mixing desk. The master mix now is hooked up directly to OBS.

Livestreaming setup simplified the L-12 connects to the streaming laptop

Now I asked myself, can I use the same trick to hook the L-12 directly to an iPad or iPhone to do livestreaming on Instagram, or other phone based streaming platforms? The L-12 can connect as a class compliant interface, so its no problem to hook it up to iOS devices. Software like Garageband will find its way in the Zoom inputs and outputs. You have to set a switch for this on the back next to the USB port.

Zoom LiveTrak L-12 Backside USB connector and switches

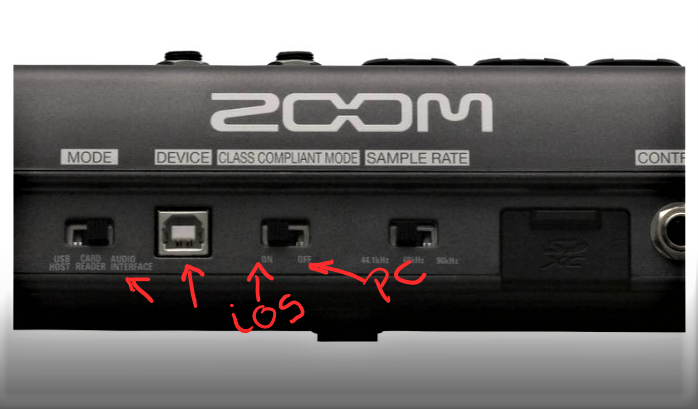
However, the master outputs are not output channels 1 and 2, so iOS devices cannot pick it up as the default audio input. So no easy live streaming on the iPad or iPhone directly from the L-12 unfortunately. For this you will need to hook up another class compliant interface that picks up the mix desk outputs and does output the master mix on channels 1 and 2.

Controlling Ableton Live 10+ with the Komplete Kontrol A49 revisited

A long time ago I wrote something about getting my, then brand new, Komplete Kontrol A49 to work. I played around with it and soon found out it was still a work in progress with control surface tweaks and drivers. I also found out that my struggling to get it to work then is still the number one article on this blog. When you look for instructions in your favorite search engine on how to get the Komplete Kontrol A49 keyboard to work you will get here. Now it’s several versions later for both Ableton Live and the Native Instruments Komplete Kontrol software, so It was a good moment to revisit the matter to see how things have progressed.

I am happy to report that setting everything up now is a breeze. Looking back, everything started to work straight out of the box with version Ableton Live 10.0.5. More good news, it still works straight out of the box in Ableton Live versions 11+. Support has become integrated now. From the corner of my eye I did see that there might be problems with Komplete Kontrol S series and Ableton Live 11+ versions, but I am not able to verify that. So, what does the support mean? It means that you can immediately start working with your Komplete Kontrol A series keyboard by selecting it as a control surface in the Preferences > Midi > Control Surface section by selecting the Komplete Kontrol Surface and the corresponding DAW input and output.

Ableton Live MIDI Preferences settings

This is just the start. If you downloaded and activated the Komplete Kontrol software from Native Instruments (through Native Access), you will find the Komplete Kontrol VST instrument as a Plug-ins intstrument. Drag it into a MIDI track and you will have instant Kontakt instrument browsing from your track. Now that takes some getting used to I must admit. Please note the following. Your A series keyboard display browse much more responsive then the Komplete Kontrol VST, so ignore the screen and focus on the tiny A series display when browsing. Click the Browse button on the A series keyboard to jump back to browsing at any point.

Browsing the Strummed Acoustic instrument inside the Komplete Kontrol VST

When browsing Kontakt instruments, nudge the browse button left or right to step deeper and back into the levels of browsing process. So at the top level you choose your either Kontakt instruments, loops or one shots. At the deepest level you choose your sounds. You will hear the selection audition a sound as you browse. If you push (don’t nudge) the browse button down as a button it will select the auditioned sound. This might take a while, so be patient. After that remember that you can click the Browser button again and nudge left several times to back to the top level. Keep your eye on the tiny display to see where you are browsing.

Once you inside the Plug-in MIDI button will light up and you will notice that the controls on your A series keyboard will automatically control the instrument macro’s. Again, touch the knob to see on the tiny display which parameter or macro is controlled and tweak and turn to get the perfect sound. This is how your keyboard should have worked from the start of course, but I’m happy to see how it has progressed. For all other plain MIDI control use you can still use the method of placing your instrument in a rack and MIDI mapping the controls to your instrument.