Yes I am using MIDI control as part of my live streaming. How? In a very straightforward way. Playing a new song will trigger a video clip playing as a backdrop for the stream. It can also trigger a scene in the lighting unit. Live streaming is my way to improve my live performances, even though a live stream is not the same as a live show. Anyway, hence my endeavors to still improve my live streams and make MIDI control a reliable part of the live stream.
The old way: MIDIControl
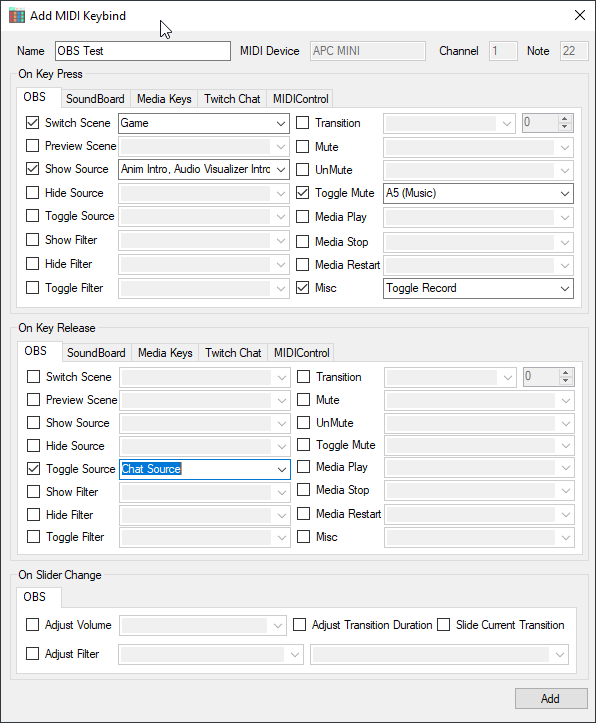
Up to now I had to rely on a separate program MIDIControl to catch MIDI events and relay these to OBS . I can tell you that any chain of devices or software is easily broken in a live stream. More then once I was in a situation where it simply didn’t work. No harm done musically, but the show does look a bit more bland. Lately a new version of OBS broke the link permanently. I had to wait for an update for the MIDIControl program.
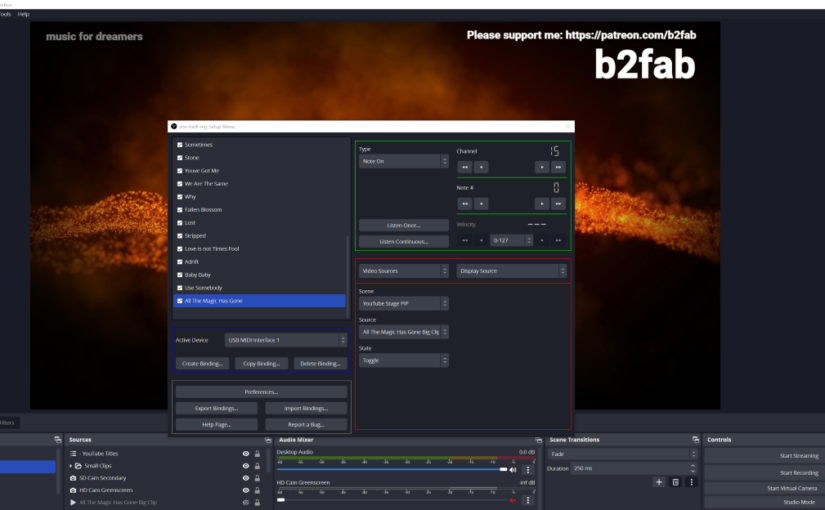
This triggered a new search for alternatives and I found one in the form of a true OBS plugin: obs-midi-mg. The first version I used was a 1.x version, the latest version 2.2 has lots of improvements in the UI. In the first version you had to step into binding, step out and step into action to make a scene change work. Now it’s all on one page, like you can see in the screenshot in the header. The big improvement for me is that it is simply there when you start OBS. No need for the chain of programs to be up and running and connected.
For capturing MIDI I use a simple and cheap USB MIDI interface. It even does not have a brand I think. MIDI on windows is very sensitive to plugging it into a different USB port, that is why I put it on a separate interface that never moves. The plugin is setup to listen for a note being played and then trigger a video source to be shown. The video source starts playing from the start when becoming visible and never loops. I keep a spreadsheet with all the bindings to keep track of the note numbers used on different channels.
I hope I have inspired you to make MIDI control a reliable part of your live stream. There are many more useful applications possible. Also for instance using a Launchpad to trigger actions on sources in your Scenes.
Last Friday I had a Halloween themed livestream in OBS. I wanted point the viewers to my upcoming song release and I wanted to play back a video with an interview I had with Pi.A about our collaboration on the new song. I tested everything in the afternoon and in the evening it turned out that there was no sound on the stream from my audio system. Bummer. After restarting the stream seemed to work again. Just a touch of real Halloween horror? I hope I can help you troubleshoot or make more advanced use of audio mixing and routing in OBS.
I spent this whole afternoon checking and rechecking my audio mixing and routing in OBS and I found no problem at all. It turns out that these things just happen. Let’s say that that is the charm of performing live, lol. However, it was something that had been long on my list to check out thoroughly, because I also had problem earlier with audio. So here is a recap of everything I know now.
Since you are probably a musician reading this, I won’t bore you with mixer basics like dBs and I’ll assume that you know how clipping sounds on audio output. I will also assume that you have no interest in Twitch Video On Demand stuff that is baked into OBS, because it is more geared towards gaming streamers.
It all starts with the sources
Every OBS source that outputs sound will appear in your center Audio Mixer panel. You can adjust the levels to your needs. Green is the safe area. Yellow is where your speech and music should ideally be. Red is the danger zone where the dreaded clipping might occur. You can mute a source to make sure it will not be recorded or streamed. By default all audio sources will be mixed to your stream or recordings.
OBS for now misses a master output level indicator. It might be added in the future. So if you mix in many different sources you end up guessing if the output will be OK. For now I exclusively mix the ASIO source, so that makes it easy to make sure the output is right. I mix in the Desktop audio just in case I have a sound from the PC I want to quickly mix in.
Just to be sure I added the Limiter as a filter. It’s not impossible to get an overcooked sound in the livestream, but the risk of clipping or overcooking goes down.
On the right track
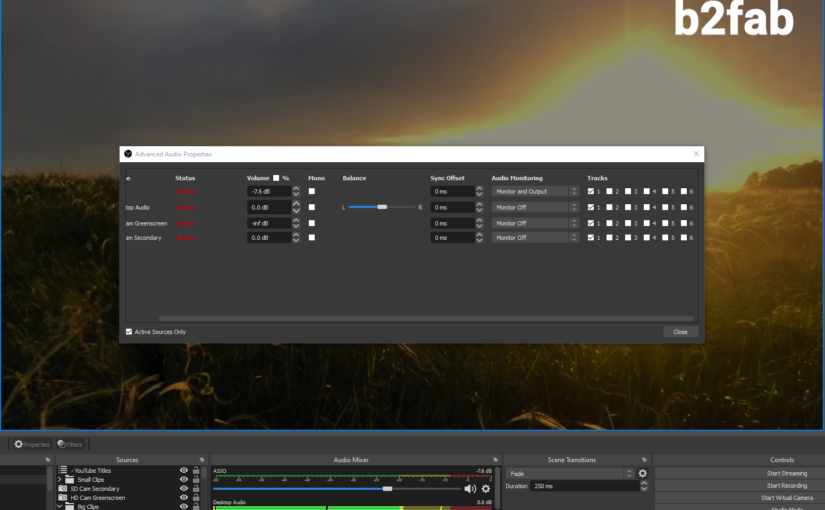
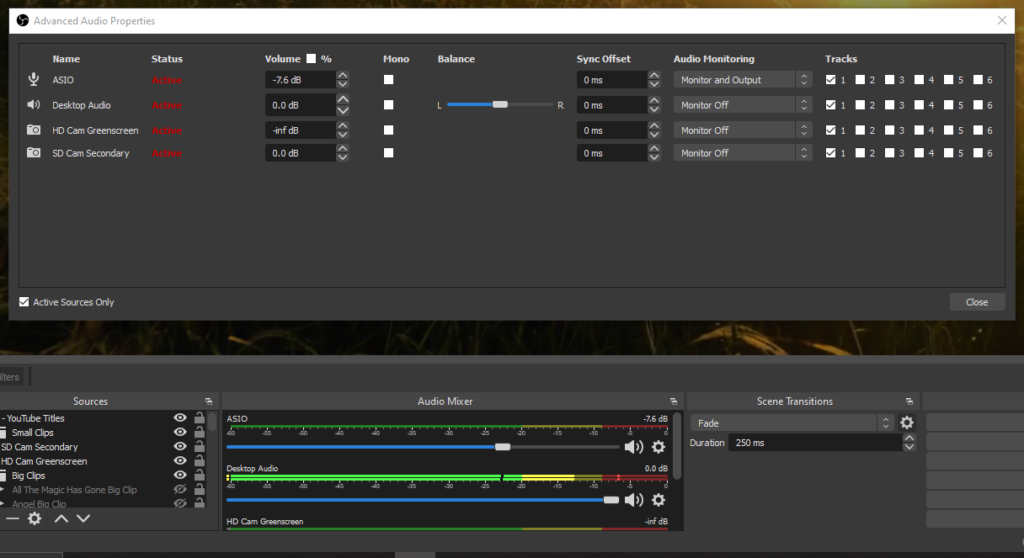
If you right click in the Audio Mixer section you can go to the Advanced Audio Properties. Here you see all your sources, that is to say you can still choose to see only active sources. I have more complex scenes where I choose per song I play live which sources are active. On the right side you will see a block of six Tracks. These are stereo tracks you can mixdown to, so in fact you have a mixer before you with six stereo tracks.
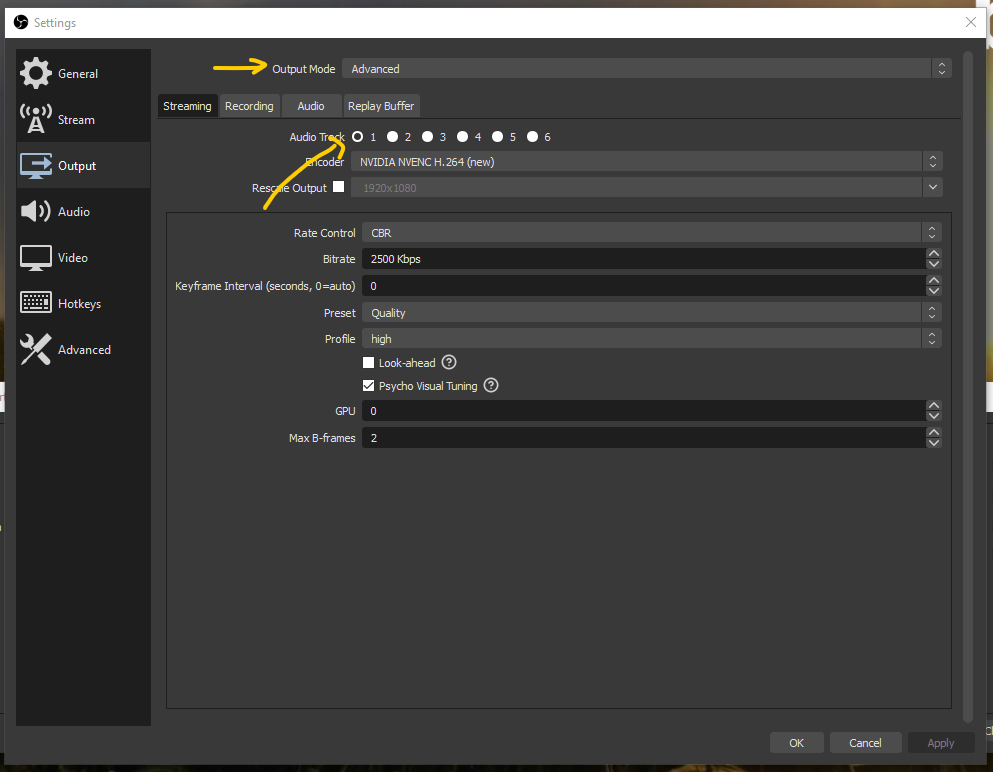
Your live stream will use only one track. You can choose which one in the Advanced Streaming Settings for Output. By default it will be track 1. Now what is the use of having separate tracks to mix to? These tracks can be used for recording video with OBS. The tracks will end up written separately in the video file it records.
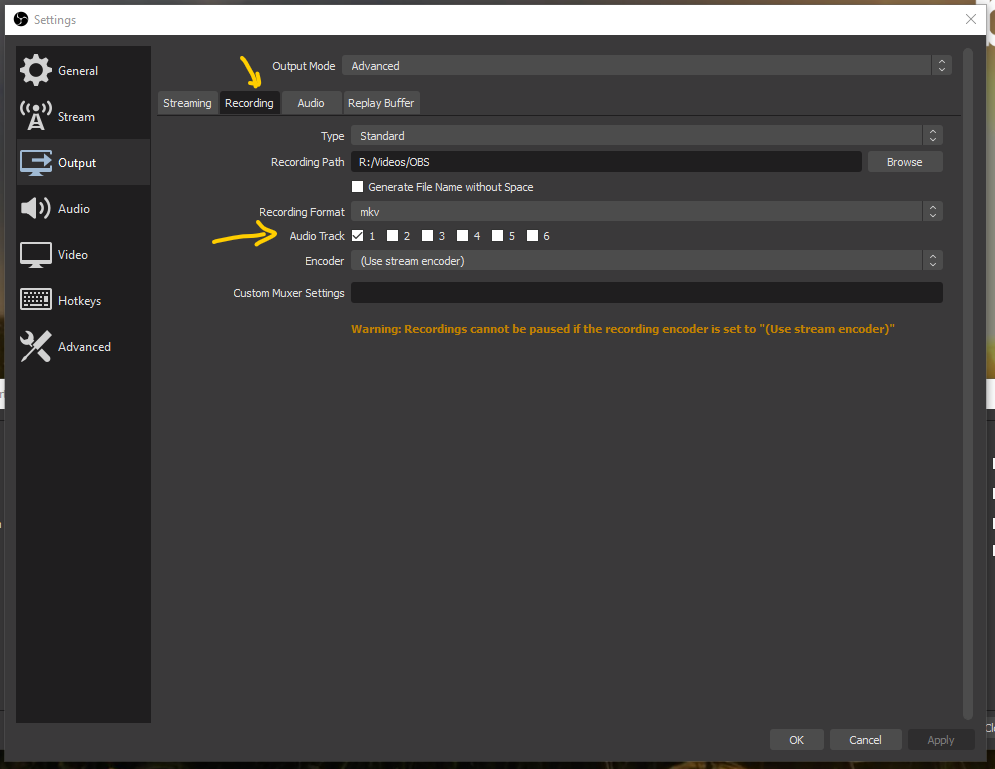
Gamers use this to have a track with the sound of the game and a track with their voice-over. Maybe also a separate track for sound effects and one for music. Then when they stream to Twitch they can leave out copyrighted music and still upload to YouTube with music. In the Advanced Recording Settings for Output you can choose which tracks will be written into the video output file.
Monitoring the output
If you leave everything set up as it is by default, all audio sources will output to your stream or recordings as you have just set it up. However there will not be any monitoring of the streamed or recorded output. This makes it heard to find the balance between different sources, if you have them. If you want to start monitoring you will have to select a Monitor option in the Audio Mixer settings. So there is also a stereo monitoring channel next to the six tracks.
In the Audio Settings, you will find the monitoring section. Here you can choose where to output the monitoring to. Please be aware of the latency that OBS introduces on the monitor output. You can’t use it live. You can just use it to find the right balance between different audio sources.
So what if there is no sound?
If you look in the monitoring options for an audio source in the Audio Mixer, there is even option to output sound to the monitoring channel, but not to the output tracks! So there is the option to set the level of an audio source to -inf, to mute the output and the option to switch off output to any of the output tracks. On top of that you could choose a track that does not get mixed to your stream. Very flexible, but it can also make it hard to find out why you have no sound on your stream.
There are only two ways to test your audio before really going live. The first one is to make sure you output the same track as your streaming track on a recording and then record a short video. The second one is to stream to an unlisted (YouTube) or private (FB) stream and then check the result. In short it is a miracle that this was the first time in maybe 50 livestreams that I had audio problems. Because it is live it is hard to know what the audience is hearing. I always ask at the start of a stream. Audio is really a tricky thing in a livestream to get right.
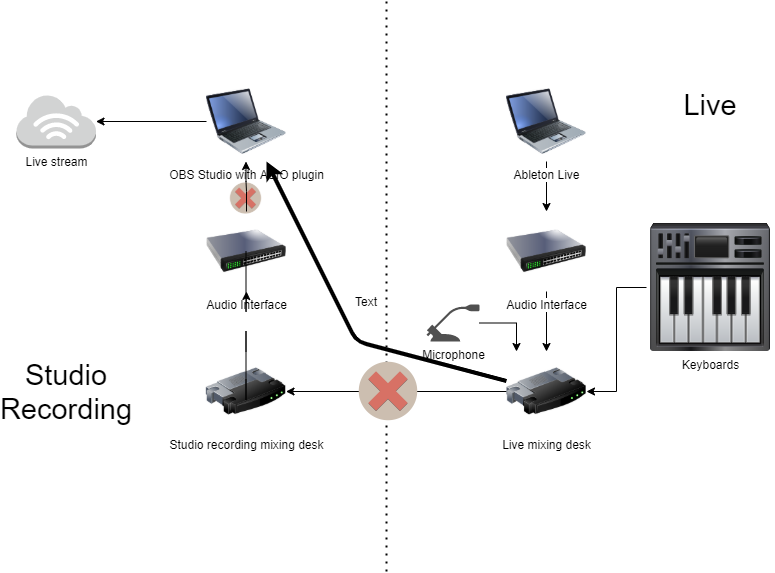
In a previous post I discussed how I try to have good audio quality for my livestream with OBS, by linking up a mixing desk I use for all live performances with a studio audio interface that I use for live streaming. So the idea is that when I know how to mix my live performance I can also livestream that mix with good audio quality. OBS supports high quality audio with an ASIO plugin, so all is great.
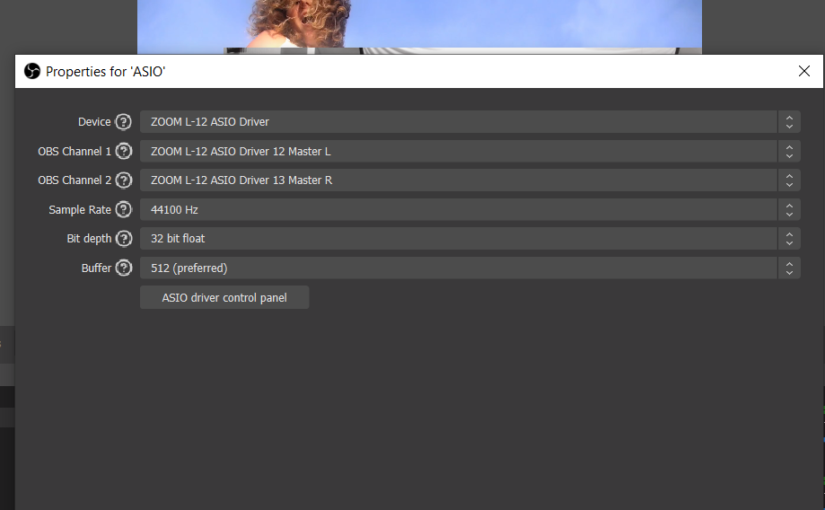
The mixing desk I use for live shows and streaming is the Zoom LiveTrak L-12. Lately I started using a separate laptop to do the livestreaming, not hooked up to the studio. For a livestream I would switch over the interface cable to the laptop. Only a few days ago I realized that the L-12 itself is an audio interface and I slapped my forehead.
Sure enough, when installing the L-12 driver software and starting up OBS with the ASIO plugin, I could find the Zoom device. After assigning the master output channels to the OBS inputs it worked immediately. So now the setup is way simpler. The livestreaming laptop is hooked up directly to the mixing desk. The master mix now is hooked up directly to OBS.
Livestreaming setup simplified the L-12 connects to the streaming laptop
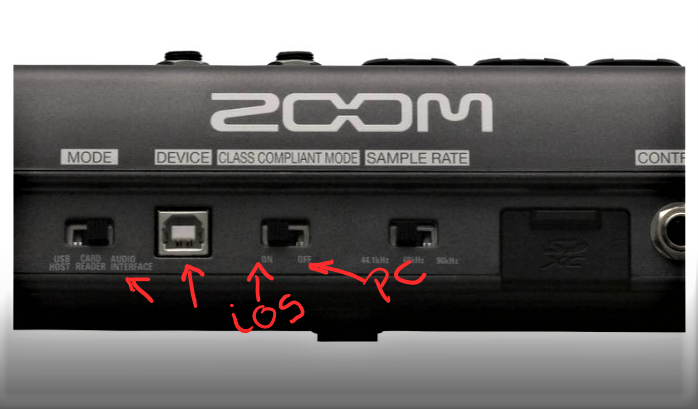
Now I asked myself, can I use the same trick to hook the L-12 directly to an iPad or iPhone to do livestreaming on Instagram, or other phone based streaming platforms? The L-12 can connect as a class compliant interface, so its no problem to hook it up to iOS devices. Software like Garageband will find its way in the Zoom inputs and outputs. You have to set a switch for this on the back next to the USB port.
Zoom LiveTrak L-12 Backside USB connector and switches
However, the master outputs are not output channels 1 and 2, so iOS devices cannot pick it up as the default audio input. So no easy live streaming on the iPad or iPhone directly from the L-12 unfortunately. For this you will need to hook up another class compliant interface that picks up the mix desk outputs and does output the master mix on channels 1 and 2.
I use cookies on this website to see statistics and make sure that you can find your way. By clicking “Accept”, you consent to the use of cookies for only this.
I will never sell your personal information. I'm in it for the music!
This website uses cookies to improve your experience while you navigate through the website. Out of these, the cookies that are categorized as necessary are stored on your browser as they are essential for the working of basic functionalities of the website. We also use third-party cookies that help us analyze and understand how you use this website. These cookies will be stored in your browser only with your consent. You also have the option to opt-out of these cookies. But opting out of some of these cookies may affect your browsing experience.
Necessary cookies are absolutely essential for the website to function properly. These cookies ensure basic functionalities and security features of the website, anonymously.
Cookie
Duration
Description
cookielawinfo-checkbox-analytics
11 months
This cookie is set by GDPR Cookie Consent plugin. The cookie is used to store the user consent for the cookies in the category "Analytics".
cookielawinfo-checkbox-functional
11 months
The cookie is set by GDPR cookie consent to record the user consent for the cookies in the category "Functional".
cookielawinfo-checkbox-necessary
11 months
This cookie is set by GDPR Cookie Consent plugin. The cookies is used to store the user consent for the cookies in the category "Necessary".
cookielawinfo-checkbox-others
11 months
This cookie is set by GDPR Cookie Consent plugin. The cookie is used to store the user consent for the cookies in the category "Other.
cookielawinfo-checkbox-performance
11 months
This cookie is set by GDPR Cookie Consent plugin. The cookie is used to store the user consent for the cookies in the category "Performance".
viewed_cookie_policy
11 months
The cookie is set by the GDPR Cookie Consent plugin and is used to store whether or not user has consented to the use of cookies. It does not store any personal data.
Functional cookies help to perform certain functionalities like sharing the content of the website on social media platforms, collect feedbacks, and other third-party features.
Performance cookies are used to understand and analyze the key performance indexes of the website which helps in delivering a better user experience for the visitors.
Analytical cookies are used to understand how visitors interact with the website. These cookies help provide information on metrics the number of visitors, bounce rate, traffic source, etc.
Advertisement cookies are used to provide visitors with relevant ads and marketing campaigns. These cookies track visitors across websites and collect information to provide customized ads.