Its the impedance, stupid!

This is a short story about something that you take for granted in this high-tech age. That you can connect anything to anything and that it just works. This time I tripped over something that did not work and it reminded me harshly that there are classic electrical laws to take in to account: impedance matching. Even more embarrassing is that I am actually an electrical engineer that switched to computer science and music.

Zoom L-12 monitoring outputs

So these days I am working on my stage monitoring. Of course its at least my performers dream to have wireless in-ear monitoring, but then you will find that you have to invest at least hundreds of euros and you can easily go up to several thousands. This is why I started experimenting with a simple wired stereo in-ear monitoring system. The Zoom L-12 mixer/recorder that I am using has 4 mix outputs for monitoring so that is the starting point.

Lets try to set the impedance story straight without getting too technical. For that you can go to the wiki page about the subject. In short its about getting the energy from the output (a mixer) optimally to the input (headset, amplifier) of the connected device. Otherwise its kind of like fitting a wide garden hose to something that is too small. The electrical equivalent: the output impedance should be lower than the input impedance. As a rule of thumb you can expect for outputs:

  • 100 ohm to 600 ohm output impedance from line outputs
  • 0.1 ohm or less from an amplifier

And for input impedance:

  • 10K ohm input impedance or more for line inputs
  • An average of 32 ohms for headphones, but it can range from 8-600 ohm
  • Around 8 ohms for speakers

This only applies to unbalanced outputs and inputs. So that means jack plugs and speaker connections. The transformers used in balanced outputs and inputs will usually match without you having to worry about it.

Enough theory. It is always a good idea to start with the ‘zero’ option. Lets connect a simple Shure SE215 earphone to the L-12 monitoring output. It says ‘Phones’. Easy peasy. The sound comes out, but the lows are kind of missing. I just skipped over this this, because I just thought that this was the quality of the output from the L-12. Looking back this was not surprising. If you check the SE215 spec sheet you will find that with an average input impedance of 17 ohm this earphone is quite hard to drive!

A lot of energy is therefore lost, because the output impedance of the L-12 turns out to be 100 ohms. This output qualifies as a line output driver, expecting a high-impedance amplifier to pick up the signal. Actually connecting earphones to this connector is a bad idea! Listening however with a directly connected Sennheiser HD 280 Pro is a more pleasant experience. This is easily explained by its more friendly 64 ohm impedance. Energy is transferred not very efficiently (almost halved), but much more efficiently than with the Shure!

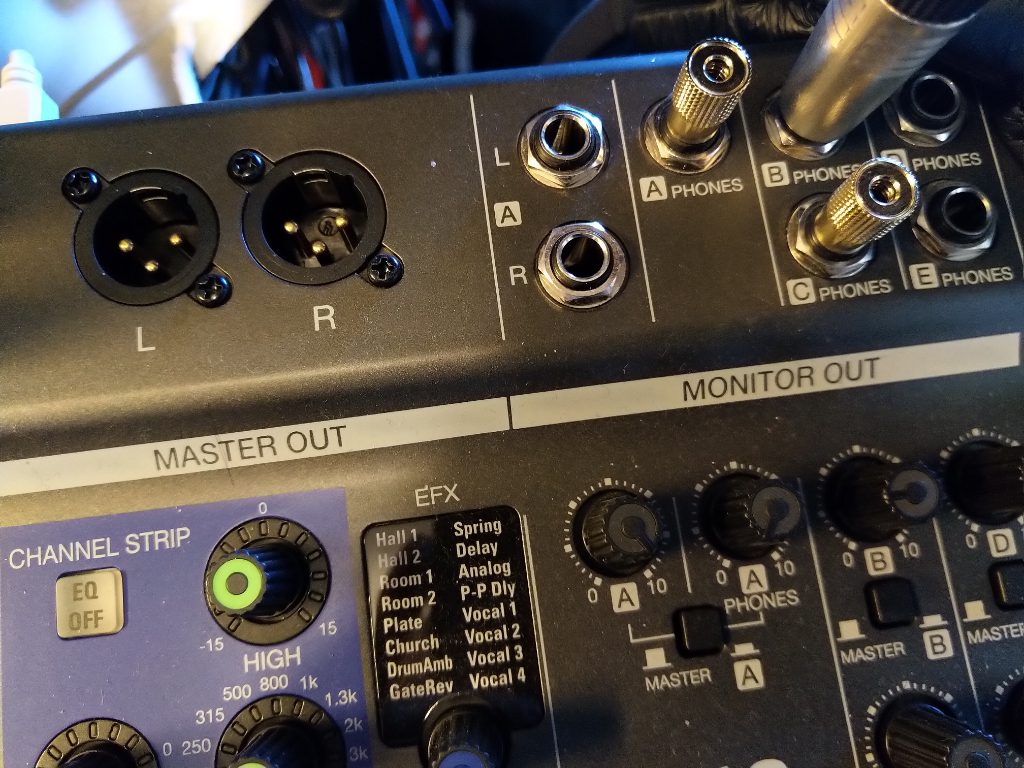
So then I first looked at the Behringer P2, a small active monitoring amplifier. It uses two AAA batteries. You can connect XLR or a stereo jack plug. Since the L-12 has stereo jack monitoring outputs, this seemed to be the way. When connecting it all and the SE215 the result was very disappointing. Like listening to overly compressed, pumping audio, with completely random frequency dips and a lot of noise. Another impedance mismatch?

I immediately blamed the Behringer P2. But when you scout for reviews, this device invariably comes out as top rated with a lot of very happy users. How is this possible? I still don’t know. Particularly vexing is that there is no specification of the input impedance of the P2. It must be that however. Because when I connect the balanced input to a balanced output, it all sounds fine. Possibly no-one uses the unbalanced jack of the P2.

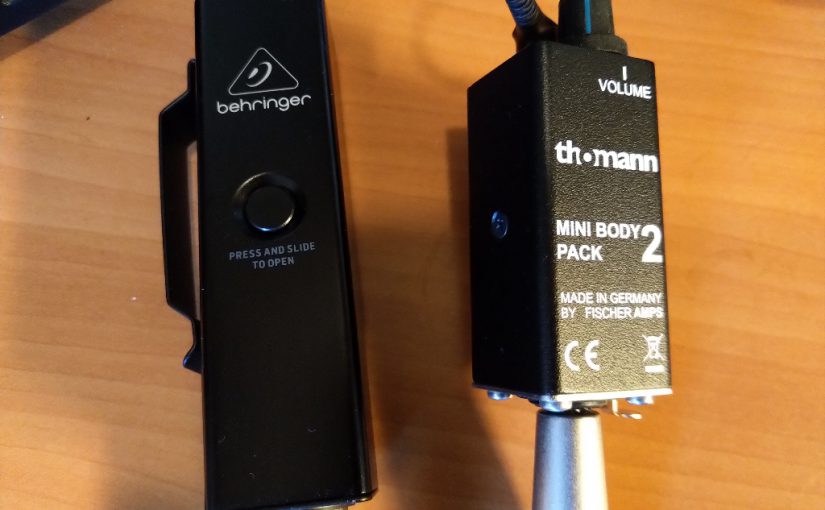
This is why have fallen back to using the Thomann mini body pack 2. It allows me to use long cables and gives me volume control on the belt mounted device. The sound isn’t perfect, because the 100 ohm output still has to drive the SE215. I am still looking for that perfect wired monitoring solution. Any ideas?

A live setup for Ableton Live

It just does live gigs

I guess most musicians use Ableton Live live like I use it. Its kind of the standard way of building a live set. This article describes the details in the implementation as I use it.

So there is Session View with the track channels laid out with different instruments and the scene rows with the different songs. Within each song several scenes with the intro, verses, choruses, break and outro. Ableton will follow the bpm mentioned in the description and you can set the Launch Follow Action to let Ableton run the flow of each song. This way Ableton will back your song live with the right scenes with the push of a button. With effects automated or manual as you want it and in the correct tempo. Additionally I use MIDI Program Change commands to instruct the Nord and the Korg to switch to the right instruments for any scene of any song.

Ableton Live live set

In my case I play solo, or with aid of other musicians. I can choose which track to leave out, the backing vocals, the bass or at least one or more keys. On the whole Ableton Live runs the show in my case, so I should be careful not to bore the audience with too much music out of the box. I should keep working on performance, video tracks and light effects all the time. I try to use only Ableton Push, avoiding the use of the laptop to start and stop.

What’s on the monitor?

Lets start cheating a little. Because not every track has drums, I rely on a click that gets routed to the monitor. In the above picture you can see the click track on the left. It just plays and plays and gets send to the Cue out Return Track C. Return Track C works pre-fader so it is in no way linked to the master mix. The cue out goes to a separate output on the audio interface and thus can be mixed to all monitors. For now this suffices.

All live instruments, vocals output and everything from Ableton Live gets mixed in by the audio interface. The audience hears the Master Out mixed and on stage you hear the Cue Out mixed with the click.

Prepare for the worst

My live set contains an instrument rack that is setup to be a playable, plug in based copy of the most important instruments I use live.  Should an instrument break down, I will then have the option to use any MIDI keyboard to replace it. The plug in sounds are not as nice as the Nord and Korg sounds, but I will have something to play instead of nothing.

Live Instrument Rack

To make sure that I will always have a way to recover in case of emergency the entire live set is stored in the Cloud. This way I can fine tune the Ableton Live live set from home and push it to the Cloud. The moment I open the laptop for a show and there is Internet it will sync up. I use OneDrive but any Cloud product is fine. Should the laptop break down, from any other laptop I should be able to recover the Ableton Live install, a few plugins and packs and any interface and sync the live set again. At the last moment a backup laptop should be ready to swap in on the spot if needed. Lets pray it will never come to this, but if it can happen it will.


Simple home recording vocals

I have been in and out of the biggest and very small studio’s, but by no means my home setup can match any of the studio’s i have had the honor to work in. Its a PC, headsets, monitors, an audio interface and a microphone essentially. Yes, there also other gear, but i could work without it. Specifically for working with vocals, there is not much more that you would need.

Hardware and software

I have invested in a better microphone. A nice condensor with tube preamp from sE. The audio interface is one of the Focusrite Scarlett models. The headsets are from Sony and Sennheiser, not too expensive. Bought for acceptable audio quality and wearing comfort. The monitor speakers are a pair of very basic Behringer types. You can’t mix on headphones alone. The PC is a bit on the weak side, but 64 bits and 16GB of memory with SSD. The whole setup as i have it should set you back around 1500 euro’s.

Then there’s software. I use Ableton and that is on its own enough to turn this hardware into a studio. I have invested in plugins for all kinds of purposes, but again they are not needed. Another 100 euro’s and you are in the music business.

Setup

Then there is no separate recording room or mixing room, when i record vocals it is all in the same small room in the attic. Call it a mess, stuffed with musical instruments and a PC. To compensate for the noise that the PC will make and the poor room acoustics I put the microphone inside a nice sE recording filter and behind a plop filter. The setup looks like this.

Heddy recording
Heddy recording

The actual noise from the PC is getting through, but is low enough to be taken out by a basic gate. When recording i make sure that the levels reach halfway from 0db in Ableton, which would be around -18 db. This leaves enough headroom and allows the noise floor to be gated out in my case.

Recording

As you can see, the trick to not using a separate recording room is the use of a headset. For the first recording sessions i was very nervous, so i put a lot of effort in setting up a separate routing in Ableton to allow for a real headset mix. With  Cue Out to another output. In practice now i just throw the Master Out into two headsets. One for me and one for the performer. Of course the monitor speakers are switched off while recording.

Personally i work with a complete arrangement, before adding vocals. This means in Ableton i will be recording in the Arrangement view. Recording in the Session view is maybe more your thing. It depends on your workflow. Just one thing, whatever way you work, make sure you know your DAW. There is nothing more frustrating then wasting the time of your singer with finding stuff out and messing up. Recording should be swift and when you have “flow” it should not be interrupted needlessly.

This also applies to the hardware of course. Messing with cables and mixer routing is a waste of everybody’s time. Know your software. Know your hardware. Need another take? Bang, start recording. Is the recording okay, but could maybe done better? Save this track. Record another. Compare. Play back. Which is better? Go back to the first recording? Okay no problem. One line went great, the next not so great? Keep the first line and only record the next line. Punch in, punch out recording. Practice this before inviting your guest performer. It makes the difference.

Tricks

Try to listen carefully while recording. Strange plops or noises? Are the words right? Did you get all parts recorded? As a rule, don’t immediately start mixing during or straight after recording. Rest your ears and have a listen again, the next day. Then start mixing or discover that you need another recording session. It happens.

And okay i admit, i also cheat a little, specifically with my own vocals. I use Melodyne from Celemony (autotune) and Nectar from Izotope (vocal processing). Two tools to get great sound with small means. It also allows for doubling voices for multiple layers of vocals and it saves a lot of studio time. Please make sure your performer agrees on you cheating.