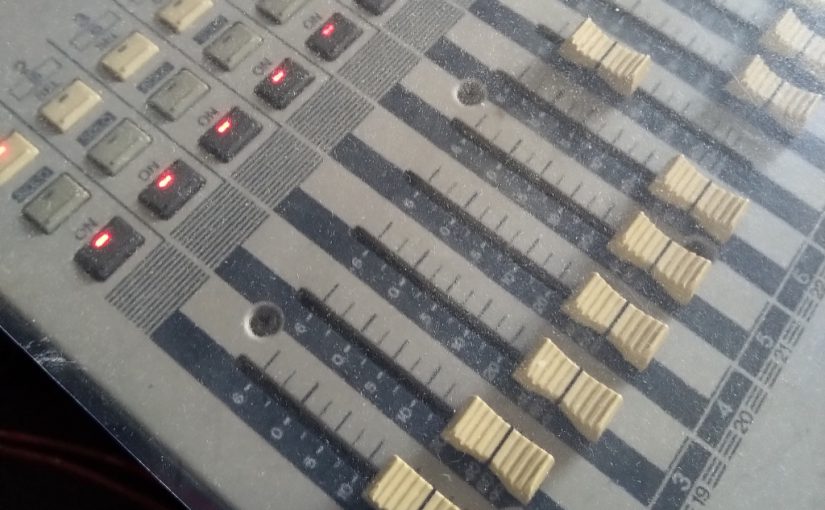
I am a big fan of custom made covers for all studio equipment. Dust kills the quality of connectors, sliders and switches. If possible I try to use the dust covers from the instrument or equipment manufacturer. Otherwise I try to look for a Decksaver, because actually these are very clever desk space savers as well. And they fit like a glove. All too often however I find that there is no custom cover that exactly fits.
I tried to find custom covers for the Yamaha 01v and the MicroKorg, but couldn’t find any. My current solution for this is to buy flexible transparent foil and have it cut to a little more than the surface area of the device. It can attract dust, but at least the dust does not get in the equipment. It also looks quite professional and is easy to pull over the surface and slip away again.
For me this beats ill fitting cloth covers and other half baked solutions, like putting it in a box. The best alternative could be to buy thick sheets of perspex and glue a custom cover. There are shops that support you in building your own perspex cover. It will however never be as sophisticated as Decksaver covers, with extra space for knobs and bends in the device. If you’re on a budget, at least put a sheet of transparent foil over your equipment and make it last longer.
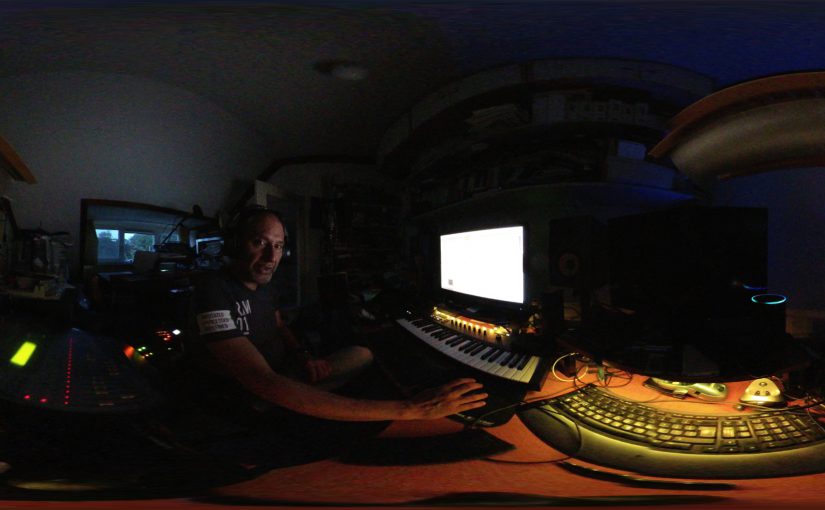
Already four years ago I started using a 360 camera. At that time I wanted to create those videoclips where you are really in the set and I wanted viewers to experience the video. The video quality was then an issue and for me it still is, unless you have a solid budget to spend. At the 3.000 euro price point video quality is no longer a big issue. At the lower end however, things have improved slightly. I have now invested in an Insta360 ONE X at a fraction of that price, 400 euro. What has persuaded me to invest in this camera if the quality is only slightly better?
First off, it comes with software that allows you to take your full 360 degree recording and cut out a flat rectangle that looks like you recorded it with a normal camera. Where is the advantage in that? It is actually intended to allow you use it as an action camera and then in the video editing cut out, pan and zoom into any action around you. You can see samples of this in the product page. What use is that to me as a musician, you might ask. Well, how about filming a whole gig from several points and cutting, panning and zooming into all the action on stage and in the crowd? Also the software has some really captivating special effects like speeding up, turning the 360 view into a ball, fish eye etc.
Secondly, it has rock-solid stabilization, because it uses gyroscopes to record all movements. This also ensures that the recording is perfectly horizontal, even when recording at an angle. You will find that if there is too much movement in your recording, most viewers will become sea sick really fast. A smooth recording and stable recording makes the difference. I can now confidently record while walking. Also freaky is that if you use a selfie stick to hold the camera, the software will remove the stick. It will appear as if the camera is hovering above you.
Schemerstad
Thirdly, it actually matters that the quality of the recordings is at least slightly better than that of the first generation of 360 cameras. The performance in low light is dramatically better and the 25% increase in pixels of camera’s in the same price range does make a difference. Am I completely happy? No of course not. I can really and wholeheartedly recommend the ONE X at the lower price tier. It has made some impossible recordings possible and I will keep using 360 as part of my video recording to capture the action and experiences.
So this is why you too (as a musician) should start using a 360 camera. Not because you want people to experience VR, but to capture everything and decide how to use the recording later. On stage and everywhere the action happens.
For a while now I have been starting up my live show. After five years of building a repertoire, I feel the next step is playing it live. I have been lucky to have had my “real pop star moment” with my previous band. A CD recording contract and live touring abroad. Now I am back to step one with my own music project.
Starting up, the most important for me is to record all practice sessions and to record all tryouts. For this purpose I have invested in multitrack recording stuff. It might just be that there is a gem in these recordings that needs exploring and investing in. This is what I learned in the previous band. Recoding, recording, recording… Learning, exploring, improving….
Multitrack live recording is easier than ever. It used to be only Tascam with analog 4 track tape recording, but now its digital 8, 12 or 16 track recording with computers, or Zoom or more exotic brands. CD quality or studio quality even. For now I focused on Zoom, because they make really affordable devices. I am not scared of using computers, but for me now it needs to be one single reliable device. Not another chain of devices with a computer at the end.
Zoom R16
So I tried the Zoom R16 first. This is a true 16 track recorder. It has the shape of a mixer, but it is actually only a multitrack recorder. It can record 8 channels at once, but has a limitation for the SD card at 32GB. My problem with it was the sound quality as a mixer, that makes it difficult to make sure that the recordings are Ok. Also it tempts you to use it as a live mixer, but it does not have adequate send/return/monitoring chain at all.
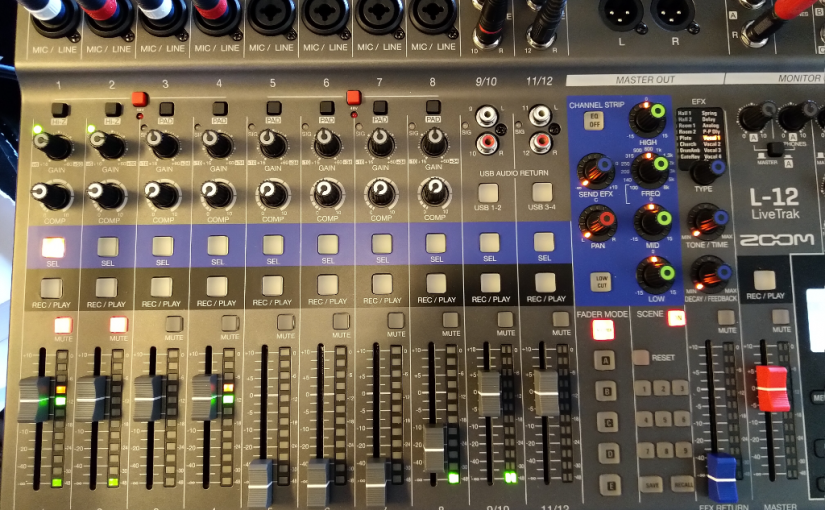
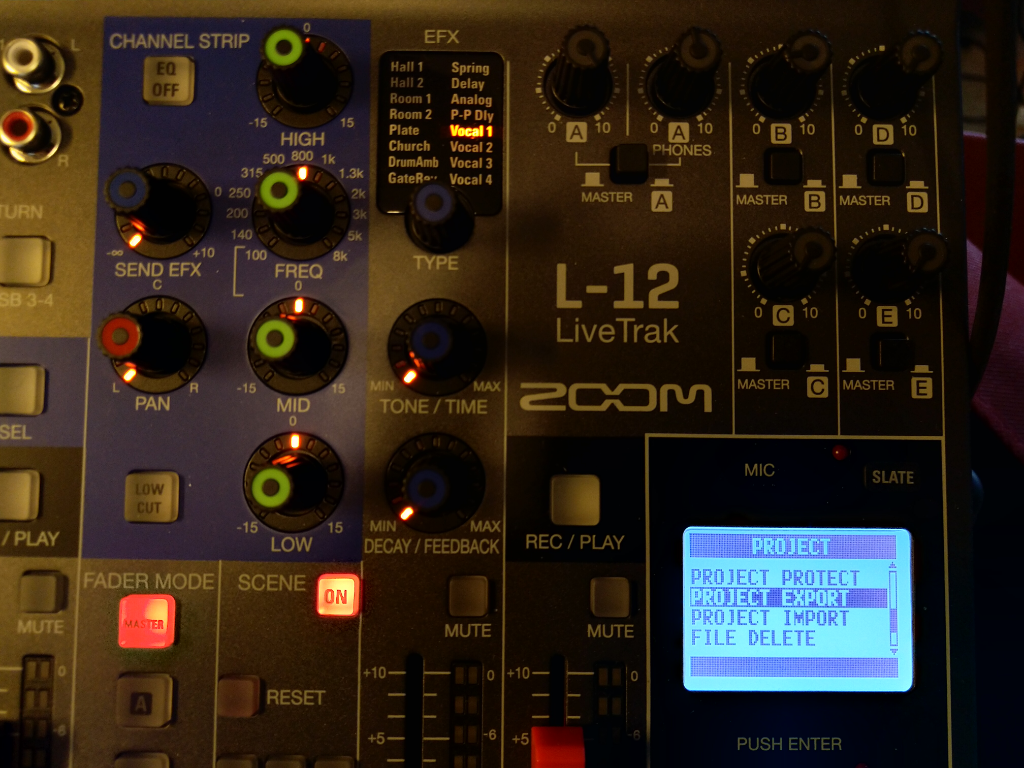
Enter the Zoom LiveTrak L-12. The sound quality of the mixer is immediately a lot better. It can record 12 channels at once. It also accepts larger SD cards and record at higher bit rates then CD quality. Unfortunately, the send/return and single effect chain is still a bit meagre. You do have a compressor per channel, but when you use it, its recorded compressed as well. This might not be what you want. The monitoring chain is a different story. Its amazing. Four, or even if you really need it a fifth monitoring channel if you separate it from the master mix.
All in all, this cannot be your live mixer for all purposes. Just because of the limitations of the send/return and single effect and the compression with the penalty of also recording it. However it is probably exactly the mixer that you’ll find in any commercial practice room. So just replace it with this one and you could have a multitrack recording of all your practice sessions. Awesome! Now if you hit a gem, you can mix it down to a demo later.
Can it be your mixer for live venues? Absolutely! Connect some active speakers and you’re live. Unless you need more send/returns and effects live of course, then you need to bring a real live mixer. The challenge will then be to connect separate tracks of that mixer to the multitrack recorder. Hopefully, that live mixer has at least enough monitor channels or busses. Otherwise you’re stuck with a recording that does not give you enough options to remix the live recording.
Now in practice, how does it work when using the LiveTrak as a multitrack recording mixer? First of, as a mixer it will remember all your mix and recording settings as part of something that Zoom calls a Project. It will save it all on the SD card when you switch off and on. You will need to make sure that you do switch off and on again on the device, not just pull the power plug. When you switch projects then you can save different mix and recording settings per project.
Like an advanced digital mixer all fader settings are saved. But because it does not have motorized faders, a led shows the stored fader settings and such. When you hit that point of the fader again, you can change the value and save that again. This applies to all mixer settings in general. To extend on this you can save 10 different scenes per Project.
Zoom Export to USB
This is nice, but you cannot from the menu simply clone a project. There is a trick however, if you switch to USB host mode you can save and restore projects on a USB stick. The trick here is to save and restore an existing Project to a new name. This way you can start recording to a new Project with settings from an existing Project.
So there you have it. This is how I use this now and I know what it can do for me. I think it is great as a practice room mixer and for small venues. Please check the Zoom site or review sites to read more about all other modes and features of the LiveTrak. I don’t use any of the other modes, so I have no experience with any of the other features. It might work for your specific purposes as well.
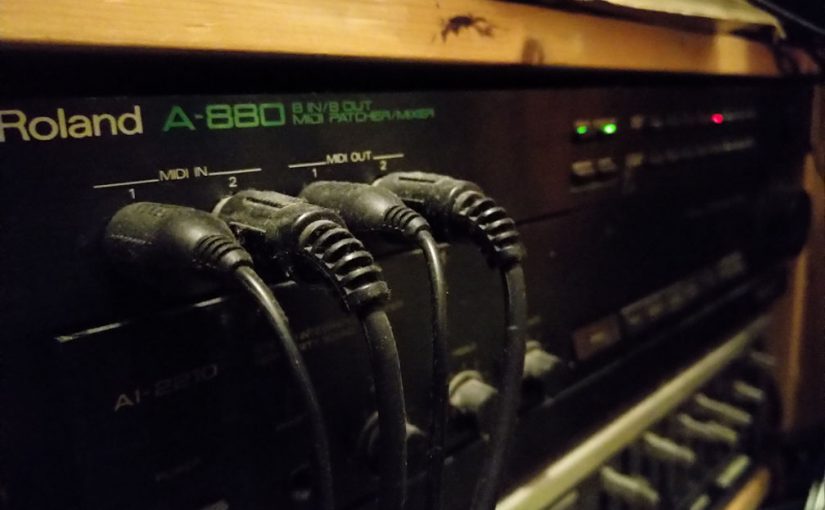
Recently I had to revise some cabling and routing under the mixing desk, when I found a rack device. A MIDI patch bay, the A880. It was happily blinking and had silently done its useful job there for at least 10 years. After looking it up, it turned out to be an actually more than 30 years old product from Roland! You can also see the dust on the cables in my setup.
Then the question is: do you need a MIDI patch bay? The answer is twofold. MIDI itself is an ancient protocol. If you have MIDI devices and a computer hooked up via MIDI, I will say that you cannot do without a MIDI patch bay. However, MIDI is showing its age and probably some of you are using USB instead. Also, new MIDI standards are now seriously being discussed. Possibly resulting in something altogether new that may not be supported by the A-880.
The current standard MIDI protocol is ancient. And when you look at it technically it is also slow and limited. Of course it is fast enough to connect a keyboard to an instrument or a computer. Most devices allow daisy-chaining to connect any chain of computer and keyboard and MIDI instruments you have. However, that is when you will find that MIDI has its limitations. If you daisy-chain more than three devices you will likely hit one of its limitations: bandwidth. When too much information passes through a single chain, then you will get traffic jams and you might start hearing hick ups.
This is where a MIDI patch bay kicks in. Instead of daisy-chaining you can now connect devices in parallel. The A-880 connects 8 inputs to 8 outputs. Each of the individual connections to a midi device from the patch bay can now pass the maximum amount of data without traffic jams. Also with some simple button presses you can determine which input gets sent to which output. Allowing you to have more keyboards and route inputs from there to more devices. The forever friendly blinking lights show you which inputs go to which outputs.
Inputs 1 and 2 are special. They are positioned on the front panel and easily reachable when you assign those as merging inputs (<- edited because of Fred’s comment below). I use the patch bay in its most simple and useful form. The inputs from my main master keyboard are mixed with the input from the computer and then sent out through all remaining outputs at once. This is the blinking pattern that been the core of my setup for more than a decade. Only occasionally I push the Signal button. Then the blinking lights show which devices actually send data.
It may be that the future of MIDI does not include the A-880. This will be the moment when I will switch off this blinking, silently working work horse. And I will remove it from its hidden place under the mixing desk.
Please note: starting with version 10.0.5, support for the A40 keyboard is integrated in Ableton live. If you use a new version of Ableton Live please read this article.
After a month of working on singing and performing. Everything but working in the studio, I wanted to get up and running again with making music. As always, I started with updating the studio software. When updating the Native Instruments (NI) suite I am using, the A49 was part of the updates. When playing around in Ableton Live after that it soon became obvious that things did not work quite right. So it was time to reserve some hours diving into this.
The NI Native Access manager was updated and the first step is then of course to check all the software installations inside it. It soon turned out that the VST installation path of Komplete Kontrol was not correct anymore. NI likes to think that it is the only source for plugins on your computer, so I needed tot tell it that VSTs are located elsewhere on the computer. The Komplete Kontrol installation was then fixed by reinstalling. Nice.
After checking if both the version of Komplete Kontrol inside Live and Komplete Kontrol as a standalone application were matching. Things started working again. A plugin rescan was needed to pick up all NI instruments in both versions, so a lot of instrument settings were not matching up apparently. Also a quick scan of the MIDI integration settings revealed that the integration was still correct.
I use the Komplete Kontrol Rack VST in Ableton Live, but when you update your NI software this is not automatically updated in Ableton Host Integration. Time to copy vst files (vst) all over again from C:\Program Files\Common Files\Native Instruments\Host Integration\Ableton Live to D:\Documents\Ableton\Library\Presets\Instruments\Instrument Rack. Or some equivalent on a Mac.
This Komplete Kontrol instrument rack can host any plug in instrument and map the A49 knobs to macros to controls in the instrument. Please note: Only use this for all instruments other than NI instruments! You must manually map any control to any control inside the instrument. Not very pretty, but once you’ve set it up it works.
And what if you do want to use a NI instrument? I also found out that instead of adding Kontakt to a track to start working with a NI instrument, as I always did, its better to use the Komplete Kontrol plugin. This immediately gives you full control with the A49 and allows you to quickly switch instruments on the fly. Oh well. Never too old to learn.
This is something that has puzzled me for some time. Do I actually need a digital mixing desk in my home studio? Well, technically no. Modern audio interfaces have a mixer on-board. So if you need 8 inputs, you could just make sure that you have an audio interface with 8 inputs. Starting at around 200 euros. Going up all the way to 3000 euro’s if you can or want to spend it for top quality. Now there are several reasons for me opting for a digital mixing desk and it all comes down to flexibility.
What you don’t want is a chain of devices that add noise on every recording. So an analog desk connected to your digital audio interface is probably a bad idea. Unless it is a very high quality analog desk with a unique sound. Something that would set you back the price of a new car. So lets try to stay in the digital domain for a better price/quality ratio.
One of the reasons to eye the higher priced segment of audio interfaces is the option of a direct cue mix. A singer, or solo musician is usually best recorded dry if you don’t have the luxury of working in a room with a nice sound or at least a quiet room. On the other hand lots of singers like to have monitoring with a bit of ‘room’ on it. A bit of reverb or even echo. When you can at least make a cue mix with just a touch of some effects on it, it can make the difference.
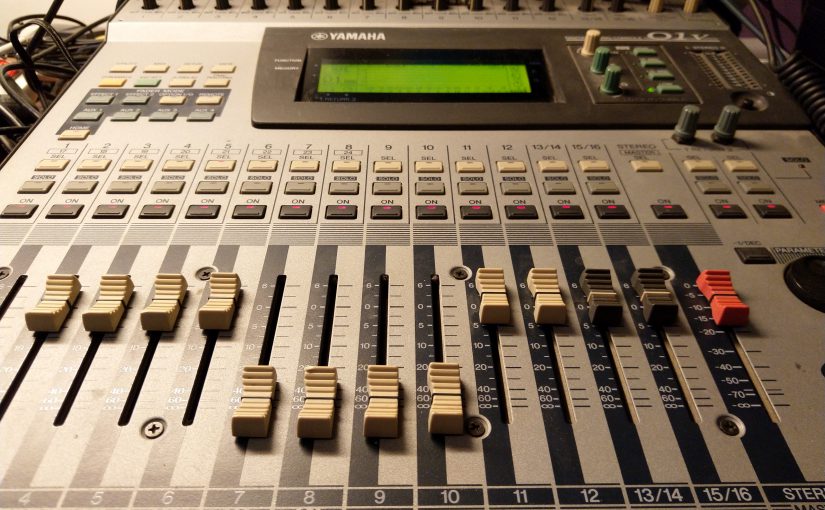
Now lets have the best of both worlds and flexibility. I chose the Focusrite Scarlett 18/8 2nd gen. It has 16 inputs, 8 analog and 8 digital and 6 analog outputs. Additionally it has stereo S/PDIF digital in/out. hence the total of 18 in and 8 outputs. Now connect the digital mixing desk to the ADAT 8 digital inputs of the Scarlett audio interface and there you have it: 16 inputs and enough cue mix options to accommodate recording of a complete band.
Ok, I was lucky to get my hands on a classic Yamaha 01V with ADAT interface, but I think it is still possible to get your hands on it or something equivalent for around 500 euros. Add to that about 300 euro’s for the Focusrite and there you have it: an affordable and also flexible setup that can accommodate any home studio recording session.
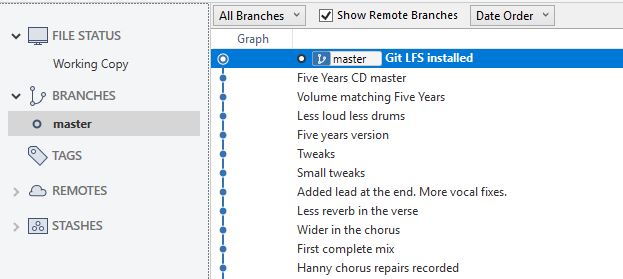
This is a follow-up of one of the first posts here keep-track-of-versions-of-your-song-with-Ableton. At first this was a bit tricky, because you could choose leave out large files, like .wav recordings and samples and even the .als project files. Or you could defy a warning from Git stating that it doesn’t handle large files well, performance-wise. This will hit you when you push and checkout your repository remotely. Now you can start using the new Large File Storage (LFS) feature, that handles versions of the large files as markers in the Git repository, improving the speed at which Git can handle these large files when getting the latest version remotely. Please note that these versioning tools might work for your DAW too.
But why Git versioning?
Lets go back to the beginning. Why should you consider using Git for versioning of your Ableton Live projects? Version 10 of Ableton Live keeps backups of your project files. If something goes wrong, you can go back 20 or more versions. The problem is, what version on which time and date contains which changes? There is no way to tell. With Git versioning you can attach a message to each set of changes (commit) and you can decide which part of which commit you want to keep. The thing that holds most people back from using Git is its complexity.
Git is even more powerful in combination with a shared remote repository like GitHub or Bitbucket. This will allow you to work together remotely on a shared project with more musicians, while at the same time giving you the liberty to work stand alone. Contact me if you want to hear more about this. Please note that some remote repositories are not free if you want to store private content and collaborate. Otherwise everything you put on it is public. GitHub now allows free private repositories.
Collaborative repository on GitHub
With its power comes a set of command line instructions that scares the shit out of any musician. For daily use I turn to SourceTree for a more graphical and pleasant Git experience. SourceTree is free and hides most complex command line instructions behind a more useable interface. There will be a time however when you really will have to dive in to the nitty gritty and this post will also dive deep. Fortunately the latest version of SourceTree also understands the new LFS features.
Large File Storage
The first step will be to install Git LFS on top of Git. By the way SourceTree has embedded versions of Git and Git LFS that you can install alongside. I have no idea how powerful these embedded versions are compared to the stand alone versions. Then here the steps you need to take to activate the Large File Storage feature. Open a command line in the project folder where you created your Git repository and type (as marked in bold):
As you can see the install statement just prepares the repository. The track statements marks large file types to be treated as LFS files. From that point you need to commit this change and its .gitattributes and you are good to go. If you want I can go live on Instagram or help you out.
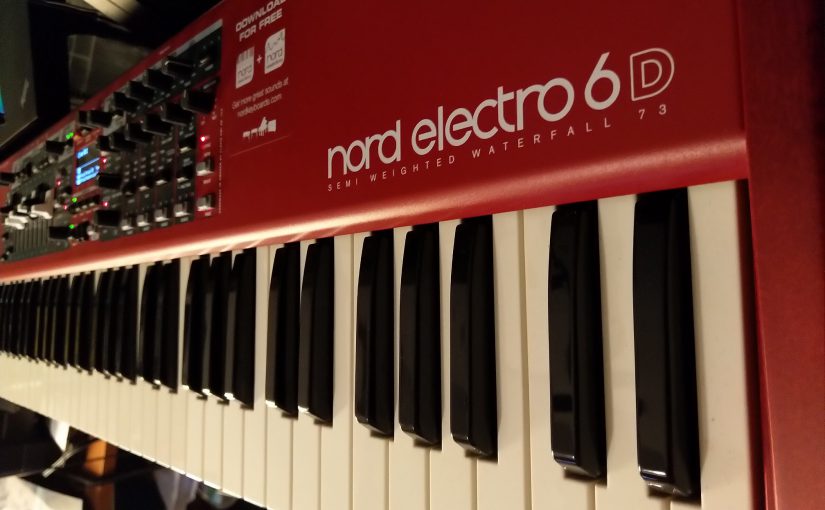
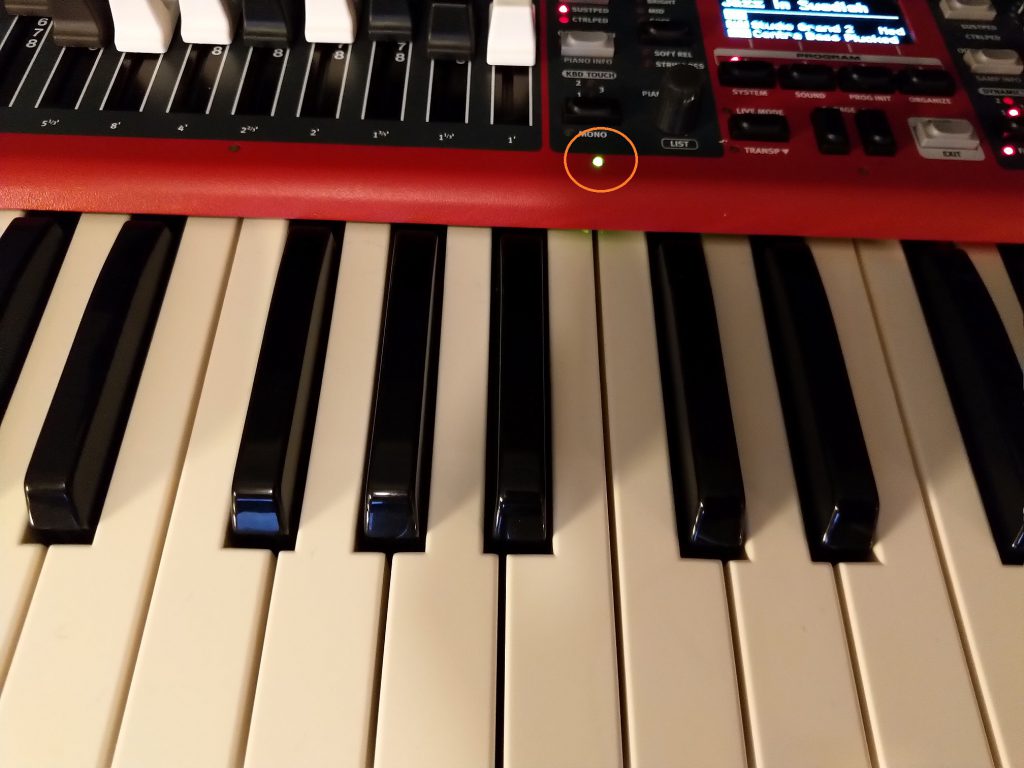
This is a about choosing my main instrument. The main inspirational instrument in the studio as well as the centerpiece on the live stage. After working for almost 20 years with the Korg Triton Pro it was time for something new. The old monster weighed a ton and it was a traditional workstation with sequencer, sampler, MOSS synth and ROM synth. I actually used only half of its functionality. Storage was on either a floppy disk (!) or a noisy SCSI disk (40MB!). Why did I go to the Clavia Nord Electro 6D? Of course, the Electro 6D is a well known and excellent instrument and there are plenty of reviews, but why did I chose it?
The main appeal was a single feature that I once had on an old Roland (D10?). It kept playing the sound as you switched programs. It sounded a bit garbled, but at least it wouldn’t cut off the sound while switching. A major irritation when I switched to the Korg. The Nord 6D series and other Nord instruments of the same generation bring this back, but this time in its full glory. The notes you last played keep playing, when you switch programs. Every key you hit after the switch plays with the new sound. This is perfection for playing live!
The other thing is: I noticed that almost all my music centers around piano, strings and organ sounds. This is where the Electro 6D excels. All sounds that don’t need pitch bend and you might have noticed that the Electro 6D doesn’t have it. The occasional whoosh and bleep and bloop can come from other instruments. Because it doesn’t have all the controls and in general isn’t made to be a master midi controller I use the Komplete Kontrol A49 in the studio for that. It has a very similar touché also.
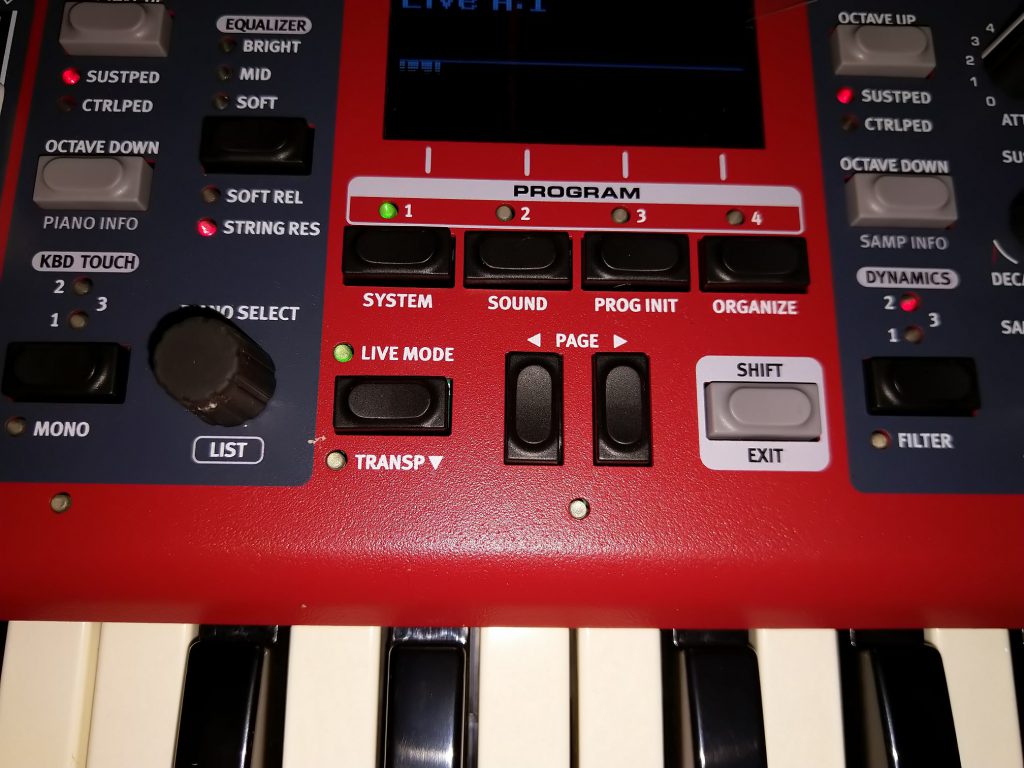
Live Mode
Another highlight of the Electro 6D is the Live Mode program selection in the center controls section of the keyboard. This switches the four program selectors into a set of pages with your favorite preset sounds. Including all mix and effect settings. This what I desperately need live. I used to move around sounds to have them as the first programs in the list, but with the separate Live Mode list I can put them right there and leave the program list as it is. Just to be sure I made a backup of my Live Mode favorites to have them back as I want, even when something gets twisted and accidentally saved as part of the Live Mode preset.
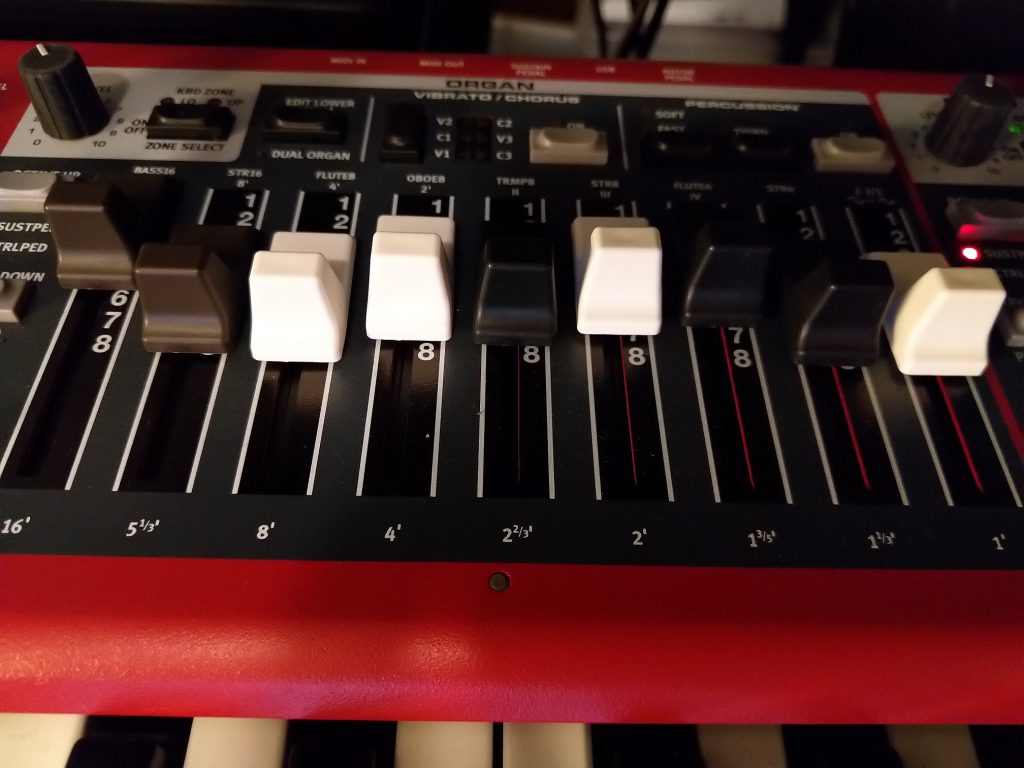
Organ register sliders
Then some small niceties. I chose the Electro 6D and not the Electro 6HP for the real organ sliders and its lower weight (9 kg instead of 11 kg). I have always played springy keys. In that sense I am not a true weighted keys piano player. I don’t use split keyboard sounds currently, but in the past I have used splits live also and the Electro 6D has the guidelight splits for that. In short, it has all the things that I dearly need and not a lot more or less.
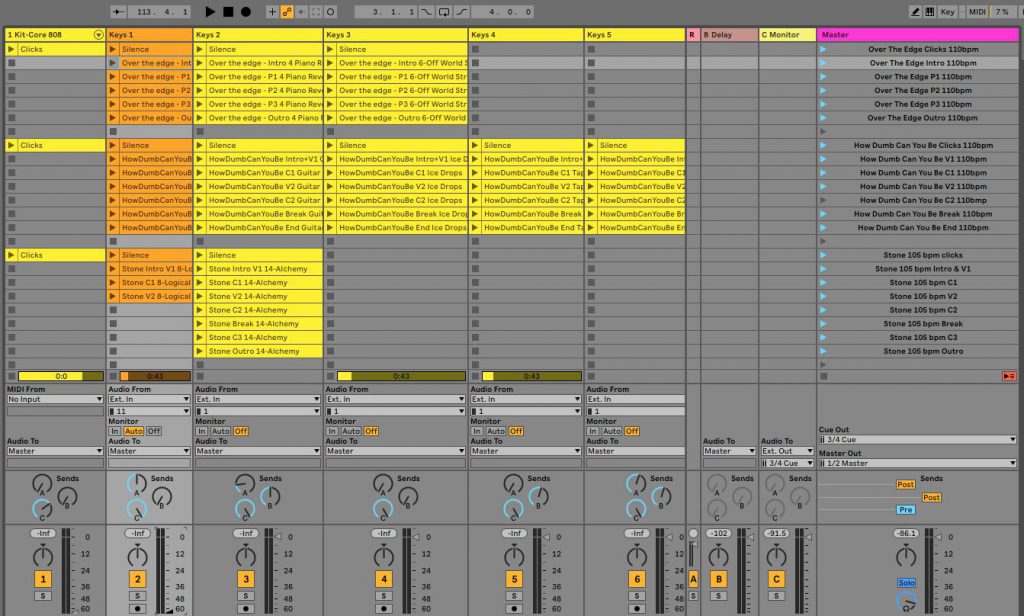
I guess most musicians use Ableton Live live like I use it. Its kind of the standard way of building a live set. This article describes the details in the implementation as I use it.
So there is Session View with the track channels laid out with different instruments and the scene rows with the different songs. Within each song several scenes with the intro, verses, choruses, break and outro. Ableton will follow the bpm mentioned in the description and you can set the Launch Follow Action to let Ableton run the flow of each song. This way Ableton will back your song live with the right scenes with the push of a button. With effects automated or manual as you want it and in the correct tempo. Additionally I use MIDI Program Change commands to instruct the Nord and the Korg to switch to the right instruments for any scene of any song.
Ableton Live live set
In my case I play solo, or with aid of other musicians. I can choose which track to leave out, the backing vocals, the bass or at least one or more keys. On the whole Ableton Live runs the show in my case, so I should be careful not to bore the audience with too much music out of the box. I should keep working on performance, video tracks and light effects all the time. I try to use only Ableton Push, avoiding the use of the laptop to start and stop.
What’s on the monitor?
Lets start cheating a little. Because not every track has drums, I rely on a click that gets routed to the monitor. In the above picture you can see the click track on the left. It just plays and plays and gets send to the Cue out Return Track C. Return Track C works pre-fader so it is in no way linked to the master mix. The cue out goes to a separate output on the audio interface and thus can be mixed to all monitors. For now this suffices.
All live instruments, vocals output and everything from Ableton Live gets mixed in by the audio interface. The audience hears the Master Out mixed and on stage you hear the Cue Out mixed with the click.
Prepare for the worst
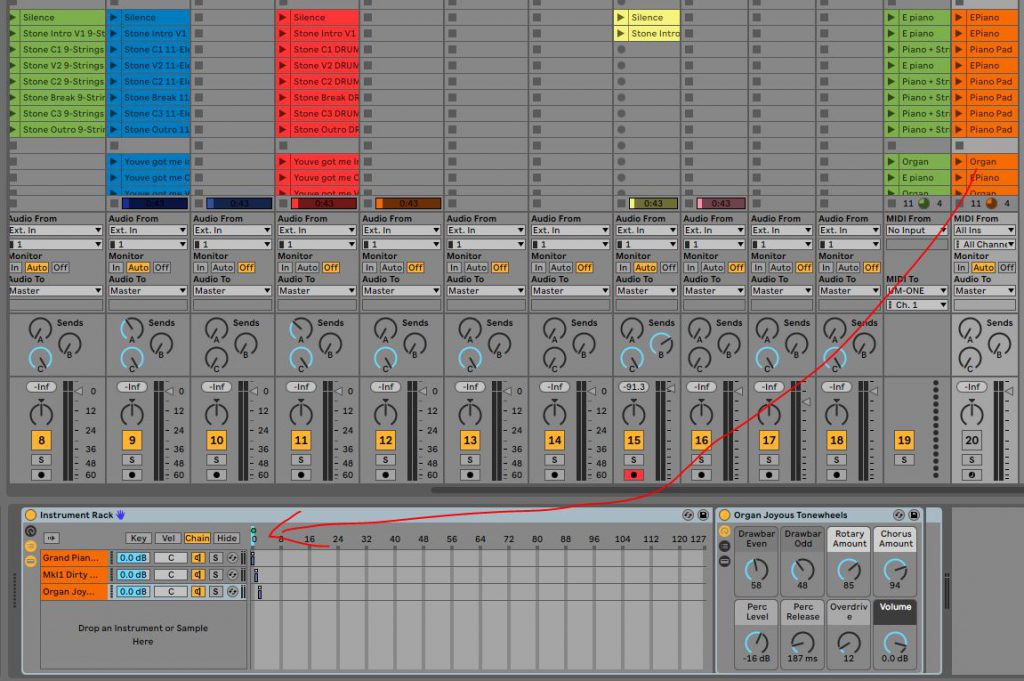
My live set contains an instrument rack that is setup to be a playable, plug in based copy of the most important instruments I use live. Should an instrument break down, I will then have the option to use any MIDI keyboard to replace it. The plug in sounds are not as nice as the Nord and Korg sounds, but I will have something to play instead of nothing.
Live Instrument Rack
To make sure that I will always have a way to recover in case of emergency the entire live set is stored in the Cloud. This way I can fine tune the Ableton Live live set from home and push it to the Cloud. The moment I open the laptop for a show and there is Internet it will sync up. I use OneDrive but any Cloud product is fine. Should the laptop break down, from any other laptop I should be able to recover the Ableton Live install, a few plugins and packs and any interface and sync the live set again. At the last moment a backup laptop should be ready to swap in on the spot if needed. Lets pray it will never come to this, but if it can happen it will.
When there is an opportunity to practice singing I take it and is there a better place to sing than in the car? Probably not. Technically its the wrong position for your body to sing, but somehow singing along in the car just sounds better. It is probably the closed area and the close in mix with the sound system that makes it work. The question is then, because practicing and recording go hand in hand: can I also record in the car?
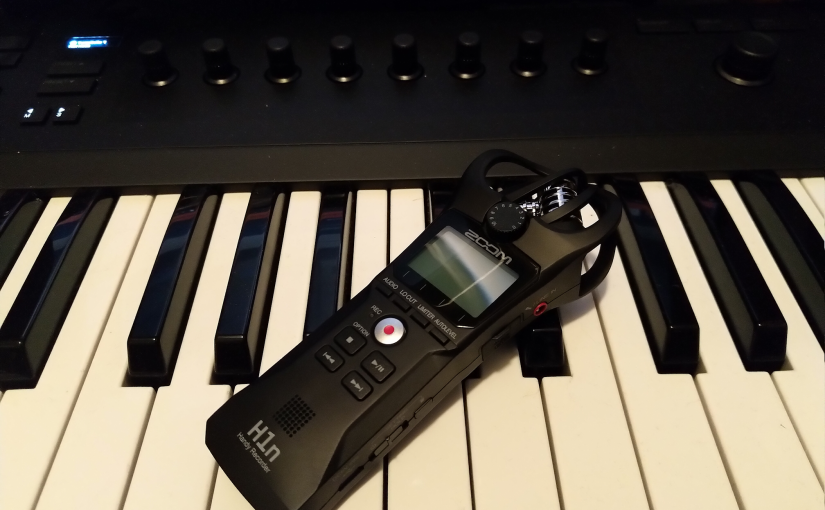
To that end I’ve tried the voice recorder of my phone and to say it bluntly: that doesn’t work. Only car sounds, no music. Fortunately I found something that does work. The Zoom H1n recorder. Now I can practice singing and at the end of the journey hear if I am on the right track and which songs need more work. Also, its a great way to experiment with new ideas along an otherwise boring trip from A to B.
The Digital Signal Processing (DSP) of modern voice recorders is not tuned to music recording. Probably anything that works as a voice recorder simply does not work for singing in a car. You need to have a broader frequency range otherwise the car sounds will just take over. On top of that you need something that can be operated while driving, so it has to be a one button start/stop operation and the recording device must really be mounted securely.
Enter the Zoom H1n. It has a camera mount, so any camera stand that can be used in the car will hold it. Then its one button to start and one button to stop. You can even feel your way through the operations so there is no need to take your eyes of the road. All the other editions of the Zoom portable recorder range will probably also do the job, but not at the price point of the H1n. Did you know you can also use it as an ASIO device? Other brands might also offer the same experience, but you should check the mounts and the capabilities for recording music.
I use cookies on this website to see statistics and make sure that you can find your way. By clicking “Accept”, you consent to the use of cookies for only this.
I will never sell your personal information. I'm in it for the music!
This website uses cookies to improve your experience while you navigate through the website. Out of these, the cookies that are categorized as necessary are stored on your browser as they are essential for the working of basic functionalities of the website. We also use third-party cookies that help us analyze and understand how you use this website. These cookies will be stored in your browser only with your consent. You also have the option to opt-out of these cookies. But opting out of some of these cookies may affect your browsing experience.
Necessary cookies are absolutely essential for the website to function properly. These cookies ensure basic functionalities and security features of the website, anonymously.
Cookie
Duration
Description
cookielawinfo-checkbox-analytics
11 months
This cookie is set by GDPR Cookie Consent plugin. The cookie is used to store the user consent for the cookies in the category "Analytics".
cookielawinfo-checkbox-functional
11 months
The cookie is set by GDPR cookie consent to record the user consent for the cookies in the category "Functional".
cookielawinfo-checkbox-necessary
11 months
This cookie is set by GDPR Cookie Consent plugin. The cookies is used to store the user consent for the cookies in the category "Necessary".
cookielawinfo-checkbox-others
11 months
This cookie is set by GDPR Cookie Consent plugin. The cookie is used to store the user consent for the cookies in the category "Other.
cookielawinfo-checkbox-performance
11 months
This cookie is set by GDPR Cookie Consent plugin. The cookie is used to store the user consent for the cookies in the category "Performance".
viewed_cookie_policy
11 months
The cookie is set by the GDPR Cookie Consent plugin and is used to store whether or not user has consented to the use of cookies. It does not store any personal data.
Functional cookies help to perform certain functionalities like sharing the content of the website on social media platforms, collect feedbacks, and other third-party features.
Performance cookies are used to understand and analyze the key performance indexes of the website which helps in delivering a better user experience for the visitors.
Analytical cookies are used to understand how visitors interact with the website. These cookies help provide information on metrics the number of visitors, bounce rate, traffic source, etc.
Advertisement cookies are used to provide visitors with relevant ads and marketing campaigns. These cookies track visitors across websites and collect information to provide customized ads.